Testing Mirrorless Cameras in Lembeh Strait (Part 2)

LembehMV14-40

Can see some issues in the corners

This is the second part of a two part post, part 1 can be found here: Testing Mirrorless Cameras in Lembeh Strait Part 1

The second camera I used was the Olympus EM-1 in a Nauticam housing, which I coupled with two different lenses:  the 8mm fisheye wide angle and the 12-50 zoom lens along with the Nauticam SMC-1 diopter.  The first thing that I noticed about the Olympus system, compared to the Sony/Nikonos system, was that it was much smaller and lighter; it had more of the feel of a compact camera than the Sony system, which was a plus in my books.  Once again I used two Inon S-2000 strobes for the set up and I spent one day shooting wide angle with the 8mm Panasonic lens and two days with the 12-50 mm lens.

LembehMV14-1

8mm, very wide!

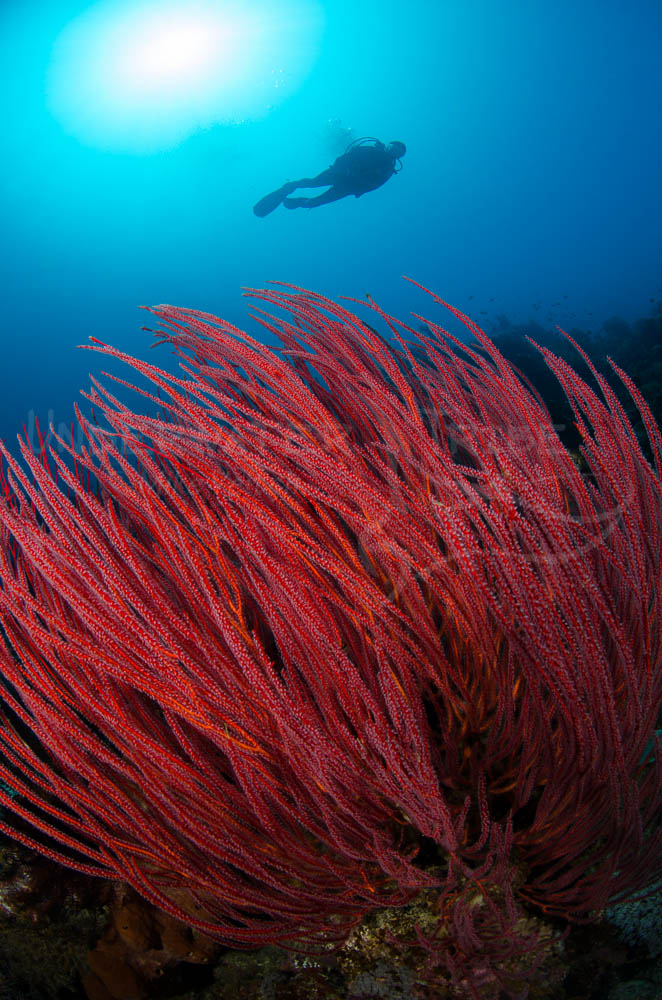
On the first day, I used the 8mm lens with the first dive at a true muck dive, Jahir, a black sand slope with good critter potential for shooting CFWA.  The first thing I did was take a few test shots of some still subjects in order to see how wide the fisheye was and how I would need to position my strobes to avoid backscatter.  It didn’t take me long to figure out that this lens is just as wide as the 10.5mm on a Nikon and that scatter and flash flare were going to be an issue just as they are with a 10.5mm.  (I note here that I was not a big fan of these small strobes for wide angle use, as a wider angle strobe like my usual Sea and Seas YS 120s would have been preferable, however, for the 12-50mm lens these strobes were great, lots of power in a small size)  The very small size of the camera and mini dome port allowed me to get as close as I wanted to my subjects (much closer than the 15mm) which gave me better creative control over composition for CFWA.  It was easy to get in close and position the strobes correctly as well, however, I would have preferred wider strobes as mentioned earlier.   Looking at the photos on my computer screen afterwards did reveal that there is certainly some corner distortion with the CFWA shots on a wider aperature such as f6.3 (look at the white eyed moray shot to see this).  It wasn’t as obvious on higher apertures and to be honest, didn’t really bug me too much on the shots that I did take, however, I would need to shoot more to see where I really stand on this.  (This is common with SLR and fisheye as well)

LembehMV14-148

Corners were better at distance with 8mm

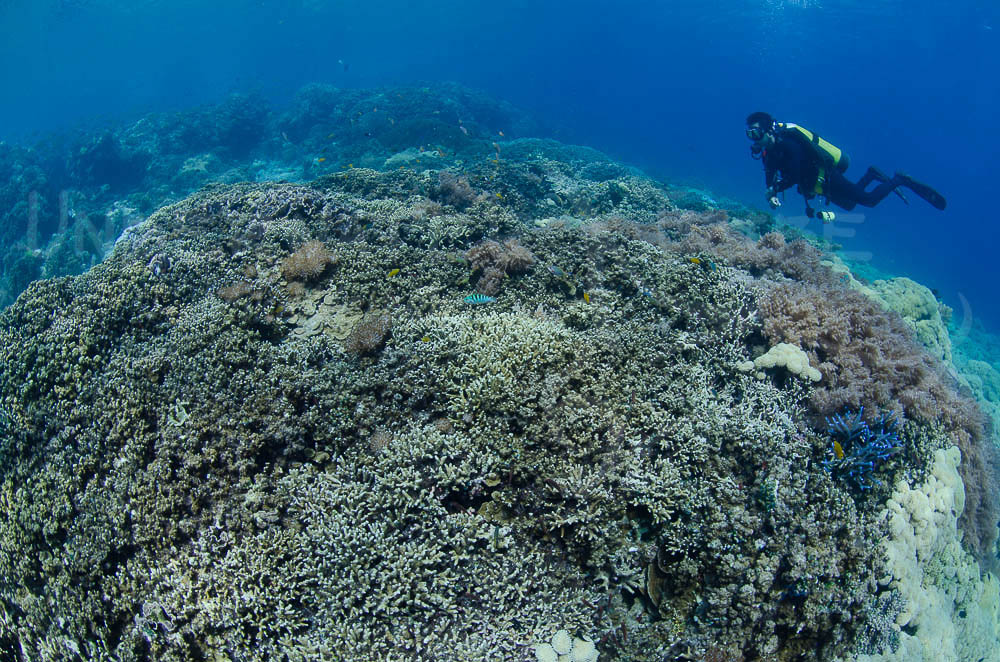
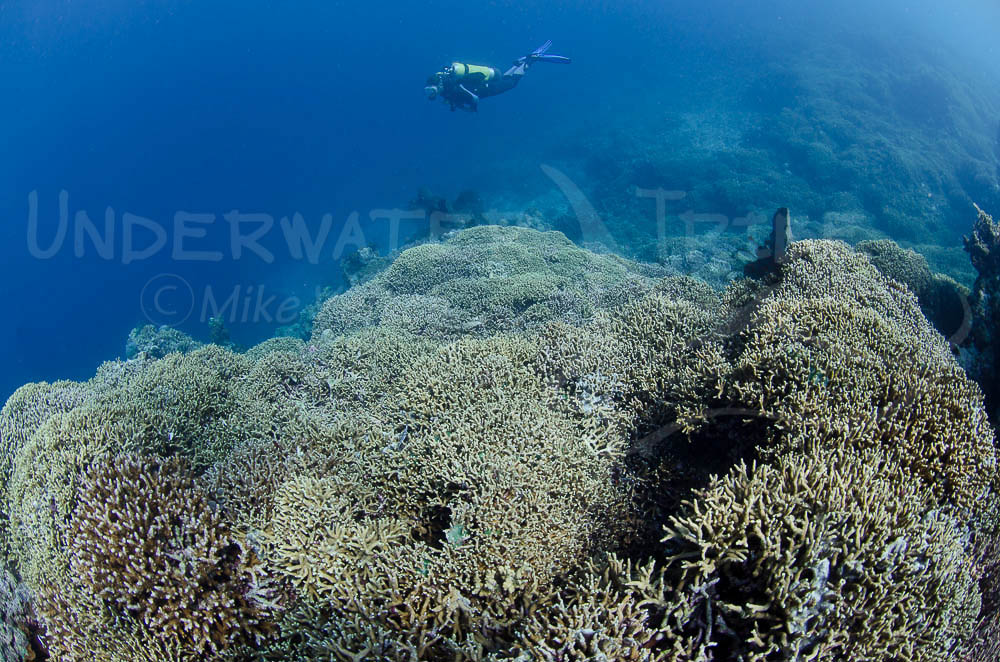
On the next dive I found a massive coral head that was covered in baitfish that were being preyed upon by several large lionfish, the perfect opportunity for a more classic wide angle photo.  I was much happier with these shots, taken from further away, but still shot between f5.6 – f8, as the distortion was not nearly as obvious in the corners.  This is not to say that this camera creates more or less distortion than my D7000 and 10.5mm, both have corner problems at less than f11 for close up work, but I would say the D7000 is marginally better in that aspect than the Olympus, but, not by much!  Overall, I was happy with the wide angle from this combination and would most definitely use it again, although with wider angled strobes.

LembehMV14-307

Focus was quick and accurate with 12-50mm

Next up was the 12-50mm lens and flat port for some “normal” shots of Lembeh critter diving.  I coupled this flat port with the Nauticam flip arm for the SMC-1 diopter in order to have an added punch of macro goodness for the small subjects that I was hoping to find.  What was really interesting about this lens and port combination was the ability to “turn on” macro mode with a simple twist of a dial.  The 12-50mm lens has a “macro” mode that allows the lens to focus very closely with it set at 43mm and the port has been designed to be able to access this function quickly and seamlessly by twisting a dial on the left side without having to manually tune the lens to that length or having to push a button to turn on the “macro” mode.  I found this to be a very cool feature of both the camera and housing, if I then wanted even more macro, I just had to swing the SMC-1 into place and I was good to go; this was a very simple and effective solution. Typically, I am not a big fan of composing through the screen on the back of a camera, especially for macro, as I find it very hard to see if what I want in focus is actually in focus; this is much easier with the viewfinder on an SLR where you are looking at the actual animal through the lens, as opposed to a screen.  On the Olympus, I was expecting to hate the focusing for macro due to this issue, however, it wasn’t nearly as bad as I was expecting.  The camera was able to lock focus very quickly and for the most part I was able to tell if the areas I wanted in focus were the ones that ended up in focus.

Macro mode worked well

Macro mode worked well

As an SLR user, I have always been a bit jealous of compact camera users who were able to zoom in and out at will as well as attach close up diopters or wide angle adaptors during a dive.  Using the EM-1 and 12-50mm with it’s native macro capability was a real eye opener for me, I found it to be a very versatile setup with the ability to shoot the eyeball of a wonderpus and then shoot a wide angle shot of it with the mere twist of a dial.  By adding on the SMC-1 with the handy flip port, this set up quickly became my favourite choice of the lenses I had tried and I didn’t even bother with different lenses after that.  For Lembeh, the 12-50mm was the perfect choice as there are so many different subjects to shoot from big to small!  With an SLR I always concentrated on one lens, but with this set up I could take great photos of every subject that I came upon.  In short, I really liked it!

SMC-1 was easy to use with swing arm

SMC-1 was easy to use with swing arm

Overall, I had a better experience with the Olympus setup than I did with the Sony, however, I am really comparing apples to oranges here as I didn’t actually try any other lenses with the Sony other than the Nikonos 15mm.  I am quite sure if I spent more time with the Sony and used comparable lenses I would have had similar results.  However, of the two cameras I was more favourable to the Olympus and I am quite inclined to buy one for myself in the not too distant future.  Looking at the images on a 27 inch screen shows that they are just as sharp and clear as an SLR and I could sell images from both the Sony and Olympus with no problem as the quality is very good.  The only downside I see of the Olympus is the strange (to me) ratio of the resulting images as I find the 4/3rds size to be squarish looking when compared to the ratio of an SLR camera and it leaves me with the sense that the photos have been cropped without locking in the ratios, but, that could just be me!

Testing Mirrorless Cameras in Lembeh Strait (part 1)

Before our recent Underwater Tribe/NAD Lembeh Photo Workshop, I decided to head to NAD Lembeh Resort in order to try a few new things in my diving life.  After a few days spent learning the ins and outs of Closed Circuit Rebreathers with the Poseidon Mark VI CCR, which is taught exclusively in Lembeh Strait by Simon at NAD, it was time to take some photos.  I decided to take advantage of Simons rental camera selection to try a few “new to me” setups while I had a few days of free time.  In fact, I didn’t even bring one of my own SLR housings, as I wanted to put these systems through a proper test and not give up mid way through and go back to my own trusty gear.  The rental systems that NAD had available for me (and for anyone interested in renting a camera while there) are a couple of the latest and greatest mirrorless cameras:  the  36 mp full frame Sony A7R and the Olympus EM-1, both with Nauticam housings.  I also rented two Inon S-2000 strobes to complete the desired “small” system that I wanted to familiarize myself with.

untitled-931

15mm Nikonos on Nauticam Housing

First up was the Sony A7R, which we paired with the legendary Nikonos 15mm lens, this system garnered a lot of press when it was first launched as the Nikonos lens is still considered one of the best ever wide angle underwater lenses due to its small form factor and great optics.  As someone who used the Nikonos V and 15mm combination for many years and thousands of dives, I was very intrigued by this new digital 15mm hybrid as I loved the 15mm with film because it was such an effective lens.  My goals were simple really: 1 – to see how the CFWA capabilities of the 15mm would compare to a modern SLR with a fisheye and teleconverter combination.  2 – see if the system was effective by being able to set the focus of the camera to a preset distance and be able to quickly capture sharp images.

Upon first inspection, this combination was certainly larger than a Nikonos V but was also smaller than an SLR, a plus for close focus images.  One of the first benefits of this setup that I noticed right away was the fact I could compose through the lens of the 15mm, whereas this lens only had a parallax viewfinder for use with the film version.  Being able to actually see the frame of what you want to compose is obviously a huge benefit!  One of the issues of this combination that I was expecting is the fact that the 15mm is a manual focus lens, so, there is no real way to tell if it’s actually in focus.  There is a “work around” for it as the Sony has a system of “coloured highlights” that can be activated on the screen to theoretically show what is in focus, however, the effectiveness of this system is not all that accurate and I never did trust it.

LembehMV14-503

Can’t get too close with CFWA

As I was in Lembeh, the close focus opportunities were abundant and varied with subjects such as octopus, common seahorses, snake eels, and other fist sized or larger animals easily found.  What intrigued me about the 15mm and mirrorless camera combination was the small size of the lens itself which would provide an easy way to aim the strobes without a bulky dome port getting in the way, common with an SLR housing.  This did prove to be true, as I was easily able to position my strobes without having any shadows intrude into the photos.  However, what was disappointing was the distance I had to remain from the subjects to get sharp focus.  With the Nikonos V and 15mm combination a working distance of 15cm was about the minimum focus distance, and this was also true of the Sony and 15mm combination so I shouldn’t have been surprised.  However, after working with a fisheye and TC for so many years, with a 2cm to 3cm minimum focus distance, the Sony combination was not satisfactory for smaller subjects such as seahorses. I kept catching myself trying to get closer which of course ended in out of focus results.

LembehMV14-668

Classic Wide Angle shots were perfect

On the second day of using this system, we headed out to the northern end of Lembeh Island to dive at some of the “classic” wide angle dive sites that offer stunning soft corals and seafans.  These photo opportunities were more inline with what I used to shoot with the Nikonos and I hoped taking these types of photos would prove more satisfactory than the CFWA ones did.  The “sweet spot” of the 15mm lens for general wide angle work is to set the focal distance to midway between 2 and 3 feet and the fstop midway between f5.6 and f8, this allows the lens to focus from about 30cm to infinity and is the setting I used for the vast majority of photos of such things as seafans and people shots with a Nikonos, and so I set it the same for the Sony. The Sony offers a wider variety of shutter speeds to work with as the Nikonos only synched between 1/30 and 1/90 with strobes (it can be set at 1/125 or higher but it only fires at 1/90 regardless).  My hopes were higher for this style of wide angle photography with the Sony/Nikonos combination and my hopes proved to be correct, my percentage of keepers were quite high compared to the CFWA photos I was shooting the day before.

LembehMV14-699

Corner sharpness was very good

Everything that I shot between 1 to 4 feet proved to have sharp focus and brilliant colours, I was also very happy with the corner sharpness in these photos.  Corner sharpness can often be terrible when using a DSLR, with both fisheye and rectilinear lenses, especially at fstops less than f11.  The ability of this camera setup to shoot “from the hip”, without waiting for the autofocus to catch or having to “dial in” manual focus, was a definite advantage, especially for larger subjects.  I can certainly see this as a great combination for larger, fast moving situations such as feeding mantas, great white cage diving, whale sharks, whales, or baitball action.

LembehMV14-699-2

Close up of the bottom left corner of the previous shot, very sharp

Overall, I found the Sony and Nikonos 15mm combination to be an interesting wide angle option but it wasn’t something I was “itching” to try again and again.  Although the sharp corners and quick shooting capabilities were a definite plus, the lack of being able to see exact focus and the 15cm minimum focus distance were negatives that put me off the system.  I would certainly consider it as a great option for fast moving subjects and in situations where smaller cameras are a plus, but the considerable cost of the camera itself means that it would be a very expensive “second camera” for most people.

Ogoh Ogohs 2014

Last night was the annual Ogoh Ogoh Parade in Bali, Indonesia (I write this during Nyepi, the traditional silent day in Bali)  If you haven’t seen my post from last year about Nyepi you can find it here:  Nyepi 2013

This years Ogoh Ogoh parade was not as large as last years but it was still a great night out and nice way to celebrate one of the biggest nights of the year in Bali with good friends and thousands of happy Balinese revelers.  I always look forward to this night to see what new “monsters” they will come up with.

Here are is a short video and a bunch of pics, enjoy!


OgohMV14-1-2 OgohMV14-1-4 OgohMV14-1 OgohMV14-4 OgohMV14-5 OgohMV14-7


OgohMV14-6

The Art of Super Macro Photography

This originally appeared in Scuba Diver Australasia Magazine as a part of the “In Focus” photography column.


Pregnant Pygmy SeahorseThere comes a time in every photographers career for a new challenge, you will know when you are ready for this when taking the same style of shots over and over again becomes static and uninteresting.  Fortunately for underwater photographers, there are many challenges available without having to break the bank.  One of the biggest, and certainly most rewarding, is the world of “super macro” photography.  Super macro is when we shoot something at greater than a 1:1 ratio.  However, it’s not easy to shoot such small subjects; special equipment, a steady hand, and a great deal of patience are all required when shooting the smallest of the small.

Equipment

There are several ways of creating a system that can take super macro photographs, and it’s not only DSLR shooters who can shoot these photographs, compact camera users can as well.

Dioptres- dioptres are a small lens element that screws onto the front of your existing lens and allows you to focus much closer than your regular lens, enabling you to fill more of the frame with your subject.   These are available in two basic formats.  The most popular is the wet-mount dioptre that fits onto both compact cameras and DSLRs.  One advantage of the compact camera in this regard is the ability to stack two or even three of these lenses together in order to focus on the tiniest of underwater inhabitants.  The second dioptre option is an internal one that fits onto the lens itself before putting the camera into the housing.  Obviously this will limit your shot selection on a given dive as you will not be able to take it off underwater.  The second negative of this system is that your “long focus” is limited to a short distance, often not much longer than two feet; this is bad when you want to shoot subjects a little further away.  Also, be aware of which brand of dioptre you buy; cheap, single element lenses will create distortion around the edges and ruin an otherwise beautiful photo.  It’s better to spend a little more in order to purchase a double element lens, this will produce sharper images..

The dioptre system works well on a variety of subjects that are easily approachable.  Many inhabitants of the reef will allow photographers to approach within centimetres.  It’s these creatures that you should be seeking when shooting with a dioptre.  Frogfish, lionfish, scorpionfish, nudibranches, and coral patterns are just a few of the subjects that come to the top of my mind.  Imagine the intricate details of a crocodilefish eyeball filling the frame without having to crop!

Dioptres are a relatively inexpensive and simple method to achieve greater magnification in your photography, as no other pieces of equipment are needed.  For those who don’t want to be stuck shooting one style of photo per dive, the external dioptre option is the system for you

Teleconverters

Lembeh09MV-3789Somewhat more complicated than using a dioptre is the use of a teleconverter (TC for short).  Used only by DSLR photographers, these are special add-ons that fit between the regular lens and the camera.  A TC usually comes in three strengths, 1.4x, 1.7x, and 2x, meaning the TC makes the lens 1.4 times up to 2 times stronger than the lens itself.  The teleconverter is great for shooting shy critters that normally can’t be approached closely with a regular setup.  Fish that are notoriously camera shy will never allow a diver with a dioptre to get close enough to get a good photo.  However, using a TC will allow the photographer to take the photo from further away than normal, meaning shy creatures can fill the frame with a pleasing composition.  Think of a field of garden eels and how unapproachable they are; when you finally sneak within shooting range they quickly disappear into their holes.  By adding a teleconverter on a 100mm lens, the working distance becomes twice as long, enabling you to stay outside of their comfort zone and still fill the frame.  Some teleconverters can be used in conjunction with the cameras autofocus system, which is a great benefit, other ones cannot.  It’s best to check that a TC will work with your camera’s autofocus before you buy it.  TC’s do have several drawbacks however.  The autofocus system slows down very noticeably and is certainly not conducive to photographing fast moving subjects.  The other drawback is that specialized ports will be required. As the TC will make your macro lens extra long, you will need long extension tubes to encompass them.

Light Light and More Light

Lembeh10MV-653One thing that super macro craves is lots and lots of light.  In order to start shooting the small stuff, one of the first things you will need is a good quality focusing light.  Typically this will be an underwater flashlight, not the spotting light from your strobe.  Spotting lights are important as they will aid your eye, as well as your camera’s autofocus, in finding points of contrast to focus on.  Having strong strobes is also a definite must.  Due to the extreme magnification of using teleconverters, the amount of light reaching the camera’s sensor is limited; the equivalent apertures are in the f64 range and higher.  Therefore a strong strobe, placed close to the subject, is required in order to “blast” enough light at the subject to expose it properly.

Trials and Tribulations

The first step to shooting a successful super macro photo is to find the proper subject.  Due to the extremely shallow depth of field found at these magnifications, only certain subjects will work.  Concentrate on looking for tiny subjects that are not very common: nudibranch rhinophores, fish eggs, eyeballs, and fish scales.  It’s these eye-popping subjects that are so out of the ordinary that they can’t help but catch the eye of the viewer and leave them wondering “how did he/she do that?”  However, you must be careful when shooting subjects at great magnification.  The key is to keep the main parts of the subject on the same plane of focus.  Even the slightest offset will cause a portion of the photo to blur.

Lembeh09MV-2209There is nothing more important in super macro than keeping a steady hand and having endless patience.  The rewards from achieving a full frame photo of a pygmy seahorse are wonderful, but don’t get discouraged when it takes 60 minutes to achieve.  Even the slightest movement from these tiny fish will throw your focus out of whack.  It’s best not to be trigger happy in these circumstances but to be patient and use small movements.  The best strategy is actually to use the camera on manual or locked focus.  By locking focus, the camera will not go into “hunting” mode; you can control what parts of the frame are in or out of focus by moving back and forth from the subject itself.

Shooting “super macro” is not for everyone.  It’s not for the photographer who wants to see as many different things on one dive as possible, nor is it a great idea to bring with you on group dive trips.  In order to fully explore this niche you will need to choose a subject and stay with it for a very long time; this is no time for the guide to be harassing you to stay with the group.  Therefore, you will need a patient dive buddy with a great eye for small things.  Another thing to keep in mind is the topography of your dive site.  Locations such as Lembeh Strait are perfect for super macro photography as it offers a sandy or mucky slope without a lot of live coral on the bottom.  A sandy bottom composition is preferred as shooting at this magnification requires a steady base, such as lying on the bottom or the use of a small tripod.  Diving in a beautiful coral garden is not recommended when trying to shoot something at 4 times its natural size!

What are you waiting for?  Head on down to your local camera or dive shop and investigate the possibilities available for your camera.  You never know, the moment you add one of these elements to your repertoire might be the time you see those tiny anemone fish babies popping out of their eggs!

Secret World of Crinoids

Doublestriped ClingfishAs part of the Sub2o Blogging team at www.Diveadvisor.com I am writing some short articles and photos about the diving world.  For my first article I have written about “The Secret World of Crinoids”

The underwater world can be a scary place for small and vulnerable species; predators lurk around every corner, both literally and figuratively! Many marine species have adapted to the constant threat of predation by evolving in incredible ways to become less “desirable” by predators.

Follow the link to see the full article and photos

Secret World Of Crinoids on Sub2o Blog

FAQ About the Underwater Tribe Photo Workshop May 2014

Each year I conduct a couple of major underwater photography workshops in some of the best diving locales on the planet.  Typically I conduct them either on a liveaboard or at a resort that offers stunning photography opportunities, great photo facilities, and a great team of guides.  Every year these are becoming increasingly popular as more and more folks want to learn the art of underwater photography.  When conducting group workshops I often team teach with another photographer, this year is no different as my business partner Luca Vaime will be co-hosting this years Underwater Tribe Photo Extravaganza in North Sulawesi.  Many folks ask us what to expect from our photo workshops so we have written this brief FAQ in order to address some of the more popular questions.  Please read on to learn more about our workshops and what they offer to potential guests.

LEMB2013041906181. Who are the workshops aimed at?

All of our workshops are great learning experiences for both new photographers as well as those who don’t get the chance to shoot very often who are looking to brush up on their skills.  They are also very informative for photographers who have more experience as we often discuss many “advanced techniques” during the course of our workshops.

2.  I am a brand new photographer, are the lessons too advanced for me?

No!  In fact, our workshops always start from the basics and then proceed onto more advanced techniques throughout the week.  If anyone is having trouble with certain ideas we are always willing to sit down one on one to ensure everyone understands the theory involved.

3.  I understand the basics but I would like to know more advanced techniques, what can I learn from the workshop?

Everyone can benefit from an overview of basics about f-stops and shutter speeds from time to time as well as expand their knowledge about composition techniques.  For more advanced shooters, the greatest benefits include one on one time underwater with the instructors, one on one image review, and the chance to discuss images with a group of like minded photographers.  Also, in our “Taking it to the Next Level” workshops we discuss a lot of different techniques such as snooting, blue and black backgrounds, effective modeling, WB and filter photography, Playing with Light, split photos, and a host of other interesting techniques that go beyond the basics.  Having the instructors with you underwater is a huge benefit when it comes to helping learn to aim snoots or taking split photos.

LEMB2013041805904.  I like wide-angle photography more than macro, should I attend the Lembeh workshop?

Yes!  Lembeh has some very under rated wide angle dives such as California Dreaming and Angels Window, also, the close focus wide angle opportunities in the Strait are outstanding with creatures such as frogfish, stargazers, mimic octopus, coconut octopus, and many others almost tailor made for a wider lens.  Also, we will start the workshop discussing f-stops and shutter speeds, which will certainly help learning to light wide-angle photos properly.

5.  I am a bigger fan of macro photography rather than wide angle, should I attend the Bunaken workshop?

Most definitely!  The Bunaken National Park is a very under rated macro photography destination with a wide variety of great critters found on the walls of the islands.  In the afternoons we will be diving a lot of the reefs on the mainland, which feature great macro critters as well as healthy reefs.  Nudibranchs, frogfish, pygmy seahorses of all varieties such as bargibanti, denise, and pontohi are more common here than they are in Lembeh!

BaliMV13-4906.  Will the Bunaken Workshop theory only discuss Wide Angle techniques?

Certainly not, our Bunaken workshop is not a “wide angle” workshop but rather a “Taking it to the Next Level” workshop instead.  We will start with discussion about f-stops, shutter speeds, and strobe positioning for wide angle photography and then continue with discussions about different lighting techniques, working with models, manual white balance and filter photography, and the art of the background.  A lot of these discussions are relevant for both wide angle and macro photography.  Also, the instructors provide one on one time underwater as well as in the classroom so it’s up to each student what they would like to discuss and learn during their personal instruction time.

7.  What is the role of the instructor during the dives?  Will I have any one on one time with the instructors underwater?

Most definitely!  We pride ourselves on spending time with our participants both above and below the surface.  Everyone will have the chance to spend a full dive with each instructor throughout the course of the workshop.   Our instructors carry slates underwater, not cameras.  This way they can communicate effectively with you underwater in order to help with camera settings, strobe positioning, and any other issues that may happen during the dives.

LEMB2013041906028.  I enjoy having my photos critiqued after a day of shooting, will this be available?

Yes, each day of the workshop the instructors make themselves available for one on one critiquing and questions before dinner.

9.  Will there be anything other than classroom talk throughout the week?

Of course, we like to provide a lighthearted yet educational vibe throughout the week.  We will show entertaining slideshows and videos in the evenings as well, and set aside enough time for everyone to work on their cameras and photos as well as have some down time.

10.  I don’t have a dive buddy who can accompany me; can I join on my own?

Of course, we will be diving with very small groups and plenty of dive guides so the ratio of people to instructors and guides is very favourable.

BaliMV13-34311.  Do I need a laptop?

A laptop is preferred for each participant; also, a copy of Adobe Lightroom is a very good tool to have during workshops as we discuss this program for editing.

12.  I only have a compact camera, can I still participate? What is the minimum camera equipment needed in order to gain the most from the workshop?

Of course!  We welcome everyone with a camera who is willing to learn more about photography.  Many compact cameras have manual controls such as the Canon G and S series and they work exactly like SLR cameras so the theory we teach works with all cameras.  However, we would suggest that a macro diopter and one strobe are a very good investment to look into before joining a workshop.  A second strobe and a wide-angle adaptor are also great investments but one strobe and the macro diopter are the perfect way to start.

13.  What does the typical day of the workshop entail?

The workshops start with a nice breakfast and two morning dives with snacks and drinks served on the boat.  After the second dive we return to the resort for lunch followed by a theory lesson presented by one of the instructors.  We will then head out on the third dive of the day and when we return the instructors host “open sessions” which is the best time for students to have their images reviewed and ask questions directly of the instructors.  After dinner the instructor will present either an entertaining slide show or else continue with more theory presentations.

14.  Will I receive any course materials?

Yes, everyone who participates will receive a full set of the presentations to keep; PDF is the format for these.

LEMB20130418058715.  Is the photo workshop suitable for open water divers?

Yes, our courses are suitable for all levels of divers.  However, we ask that anyone who is starting on the path of underwater photography to have good buoyancy skills before starting photography.  Carrying a camera underwater and trying to get close to subjects close to fragile corals is not an easy task and good buoyancy skills are a must before using a camera underwater.

16.  Will I have internet access?  I have to follow up with my job back home and stay in touch with family.

Yes, both NAD and Thalassa have internet access.  However, due to their remote locations it’s not as fast as internet in first world nations, therefore, uploading large files and downloading videos and YouTube is not possible.  However, emails, web browsing, and Facebook are all readily available.

17.  How far is Bunaken from Lembeh?

The transfer between NAD and Thalassa will take around 1.5 – 2 hours depending on traffic conditions.


Attending the Wildlife Photographer of the Year Awards 2013

Attending the Wildlife Photographer of the Year Awards 2013

WPYevent

Back in May of this year, I received an email from the Wildlife Photographer of the  Year committee telling me that I had WON the “World in Our Hands” category of the WPYA, the most prestigious event of its kind in the world.  As you can imagine, I was instantly on Cloud 9 and very excited about what an honour it was; let me tell you, it has been a long six months trying to keep that one to myself!

London2013MV-56

Along with the honour of the award, category winners and runners up are invited to attend the awards banquet at the Natural History Museum in London along with several “media days” during awards week.  As it’s the first time I have ever won anything in such a big competition, I didn’t hesitate to attend; it’s one heck of a big ceremony!   The event started at 18:45 with a champage pre-banquet social and then everyone filed into the main area for the award ceremony.  I am guessing that there was easily between 500-1000 people at this event with sponsors, judges, vips, and photographers spread out throughout the main concourse that features the skeleton of a massive Brontosaurus as the focal point.  After a quick intro by the two MCs, they launched directly into the awards starting with the youth awards and then the major categories.  My award, the World in Our Hands, is one of the “main categories” and I believe I was called to the stage as the 5th winner.  I posed for a photograph, received my award and was asked a couple of questions before heading back to my seat where I was able to watch the rest of the winners and photos being presented.  After a break for dinner, the main event proceeded with the awarding of both the Youth Photographer of the Year and the Wildlife Photographer of the Year.  As a category winner, my photo was one of 12 images eligible for the main prize and the sense of excitement really kicked in as they dragged out the announcement which I am sure had all of the potential winners a bit nervous!  Although the image that I liked the best didn’t win (no, not mine, but rather the one of the polar bear looking out from the ice) the winner was certainly a worthy one, a ground eye view of a group of elephants at a water hole.

London2013MV-74 London2013MV-52 London2013MV-23

After the Grand Prize winners were announced we headed out to the main area of the museum to see all of our photographs displayed, along with the runners up and highly commended, in some very effective backlit display cases.  If you get a chance to visit the museum, it really is an effective display and shows all of the images at their best.  I also knew several of the attendees at the event such as Julian Cohen and Alex Tattersall who were runners up in Cold Blooded Animal Behaviour and Underwater World respectively.  The group of us really enjoyed seeing the photos and I believe we were all very impressed by what an amazing event it was.

Julian3 Julian4 Julian2 Julian1 London2013MV-87 London2013MV-96

Hopefully I will be back again some day!

Thanks to Julian Cohen for most of the photos, I have stolen them from him!

All of the winning images can be seen at the Natural History Museum website: http://www.nhm.ac.uk/visit-us/whats-on/temporary-exhibitions/wpy/onlineGallery.do


The Art of the Black Background

Its about time for me to write a new newsletter, I try to write them 4 times per year but sometimes I am not that consistent!  If you have never received my newsletter, one of the things that I always put in there is a short “UW Photography Tip”, for example, the following is the photo tip from my November 2012 newsletter about black backgrounds.  If you don’t receive my newsletter, please sign up here on any of my web pages and you will automatically receive it.  Its a great way to keep updated with news, new trips, last minute trips, and of course photo tips!

Anthias with parasitic copepods

One of the most effective macro photography techniques is the use of a black background to make that special critter shine!  A lot of folks believe that a black background can only be achieved by Photoshop manipulation, however, this is far from the truth.  The art of the black background is quite easy actually, and it comes down to just a few simple steps.  First, the subject must be perched upon something that allows the camera to get under it and shoot up; seagrass, a rock, a sponge or a bit of coral or in the water column itself (like the anthias photo above).   A second key ingredient is the depth and available ambient light: the ambient light needs to be relatively low and the photographer should be relatively deep in order to avoid the bright surface water.  Trying to shoot up into bright sun in shallow water will not work as the sunlight will give too bright of a background.  Next, the camera should be on f-11 or higher and set on the highest shutter speed that it can successfully synchronize with. Try using these tips and black backgrounds should be a breeze!  Don’t get frustrated if it doesn’t work at first, simply pull back, think about what went wrong, make a few adjustments and try again!

Lizardfish Pair

  • Coral Gardens, Menjangan, Bali

Menjangan Island, Bali

Have you ever been to Menjangan island in Bali? Often overlooked due to the popularity of Tulamben on the NE coast (home to the Liberty Wreck) Menjangan is a small island on the NW of Bali that features some wonderful wide angle diving opportunities such as soft coral covered slopes and fantastic hard coral gardens. There are also some interesting surface interval activities such as photographing the huge Ganesha statue or hiking up to the coral temple where locals often come for ceremonies. If wildlife is more your concern, Menjangan is known for hosting a population of wild deer which can be seen with a short walk around the island. When diving here we like to stay in the Pemuteran area, which is also close to the famous muck dive Puri Jati, so divers get a great combination of large and small while diving in north Bali.
BaliMV13-1051

BaliMV13-1072

BaliMV13-1115

BaliMV13-1199

BaliMV13-1250

BaliMV13-1300