Another in the series of previously published Scuba Diver Australasia In Focus articles
8 Ways to Improve Your Photography on a Single Dive
It’s a brand new year and I am sure there were lots of underwater goodies in the stockings of avid divers during Christmas. For those who received a new camera, it may seem like the “latest and greatest” camera should be able to take stunning pictures straight out of the box. However, sadly that is just not the way it works with underwater photography; don’t be dismayed however! Here are 8 tips to consider on your first dive with that great new piece of technology.
Get closer

This is the single most important piece of advice for any new underwater photographer. Although it’s tempting to use the ever present zoom control on your compact camera, it’s always best to use your fins to “fill the frame” as opposed to the zoom dial. Getting physically close to the subject adds a host of positives to your photography. Foremost, it means there will be less water between your camera and the subject; this means less backscatter and richer colours in your photos. It also means you can utilize a higher numbered f-stop in order to maximize how much of your photo is in focus. Remember, the higher the number, the better the depth of field. However, don’t just ignore that zoom dial, it does have an important role in photography. When you have gotten as physically close as you can to your subject, but the composition still doesn’t work right, utilize the zoom dial to isolate your subject and fill the frame before you shoot.
Use Add On Lenses

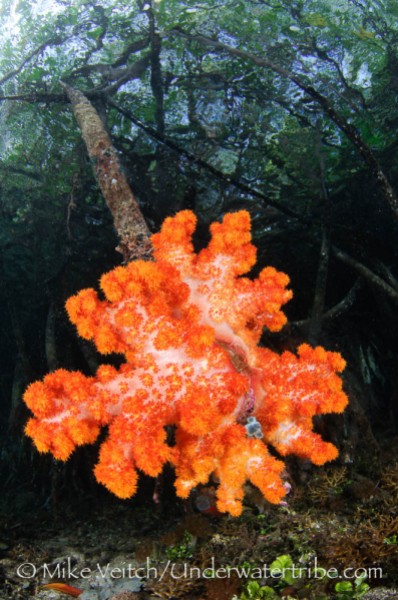
If Santa was kind, you may have also received some “add on” accessories with your housing. This could be a macro lens, a wide angle lens or even better: an external strobe. By utilizing all the tools at your disposal, your chances of a stunning photo increase exponentially. One of the drawbacks of a compact camera is a relatively narrow field of view when it comes to pure wide angle photography. In order to light up an entire sea fan, soft coral or charismatic megafauna, a wide angle lens is a must. By allowing you to fill the frame with your subject from a closer distance, it allows all of the benefits discussed above. To really make the colours of a soft coral “pop” you need to have your camera as close as possible to the subject. A wide angle “add on” allows this but at the same time does not restrict you to only big subjects on a single dive. The beauty of the compact housings is the ability to change these “add on” lenses underwater.
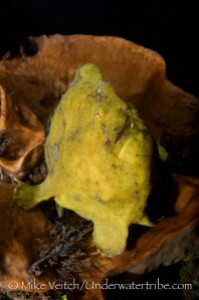
For the critter lovers there are also “macro” lenses available. Although many compacts come equipped with a macro preset, it is very limited in its usefulness underwater. Some brands of camera will not allow zoom while in the macro mode and others even restrict the use of flash. In order to fill the frame with your subject you need to be mere centimetres away from it! Obviously this does not work well when it comes to shy fish or invertebrates as they won’t often allow a diver to get that close. By adding a supplemental macro lens you can enjoy the benefits of zooming in tight on small subjects without having to get so close that it runs away. There is even the ability to stack macro lenses on top of one another for that extra tiny pygmy seahorse.
Use an External Strobe

The greatest “add on” you can add to your system is the external strobe. One of the drawbacks of the compact camera is the shadow that it casts over the subject from the lens mount. The only cure to this bit of frustration is adding an external strobe and arm set to your system. By getting the strobe up and away from the lens, you will eliminate shadowing right away. Another major benefit of an external strobe is the ability to minimize image ruining backscatter. An external strobe allows you to utilize “edge lighting” and not illuminate particulate directly in front of the camera. A third major advantage of an external strobe is the power output available. By having a wider and stronger flash, larger objects can be lit properly to bring out rich and pleasing colours.
Shoot Up

This may sound simple, but by getting low and shooting up, your photos gain a whole new dimension and contrast. One of the most common mistakes a beginner makes is to hover above their subject and shoot directly down on it. This results in the recognizable anemone and clownfish combination looking not like a bright and beautiful bit of nature but rather more like a bowl of spaghetti and orange meatballs. By getting down to the anemone’s level and shooting straight or a little upward, the fish will look like a fish and the anemone can look like a “technicolour dreamcoat”. In wide angle photography, the advantage of shooting up is instantly obvious. By aiming toward the surface, you achieve rich, colourful foregrounds contrasted against deep blue backgrounds.
Shoot Vertical
Shooting vertically is another simple trick with major rewards. Although it may seem a little unnatural at first, a quick turn of the camera will bring out the natural lines of subjects that a horizontal viewpoint can’t display. Think facial portraits, nudibranches, or eels; all of these subjects are well represented by a vertical composition. Another thing to remember is the rule of thirds; align the eyes or main part of the subject along the top or bottom third of the frame in order to create depth and balance in the photo.
Stop, Watch, Shoot

The most memorable photographs are ones that capture the behaviour of the subject. The underwater world hosts a plethora of animals that perform a variety of interesting activities night and day. Eating, fighting, mating, and cleaning actions are a small sample of different actions that marine life exhibit. However, it’s not an easy task to capture these behaviours on camera. Simply seeing a shrimp cleaning the mouth of a grouper does not mean you can get a photo. If you rush in as quick as possible to capture the moment, you will be shooting yourself in the foot. In order to shoot behaviour sequences properly it takes patience and a bit of stealth. The smart way to approach these events is to “stop, watch, and shoot”. By stopping to watch the action from a respectable distance, you give the animals time to become aware and comfortable with your presence. You can then slowly close the distance until the subjects are within the focal distance and fire away.
Critical Review and the Histogram
By far the greatest advance of photography in the digital age is the instant feedback found on your monitor. Unfortunately, not enough folks use this tool to their advantage during a dive. The monitor can be used to check the focus, the lighting, and for any distractions throughout the frame such as a wayward diver in the background. In order to utilize this properly you must look at the entire frame, not just the main subject. It’s often the negative space (everything but the main subject) that makes or breaks the photo. Take the time to step back from the subject and look intently at your photo, don’t just take a series of shots and move on to the next subject. By critically reviewing the photo while still in front of the subject, you can make fine adjustments and take the photo again. The “histogram” is the best way to double check exposure, especially in very bright conditions. By understanding how to read the histogram you can adjust settings appropriately in order to achieve the best exposure. There is plenty of information about reading histograms freely available on the internet.
Know Your Camera!
One downfall of many new photographers is their eagerness to jump straight into the water without learning all the capabilites of their camera. In order to capitalize on capturing wildlife, you need to know how to change settings such as shutter speed, f-stops, EV compensation, and the macro button as quickly as possible. As the situation changes underwater, you don’t have time to fiddle too long trying to figure out where a particular button is. By practicing on land and reading the instruction manual, you will gain a great advantage underwater as it becomes second nature to change settings on the fly.
Although it may sound like a lot, these 8 steps are quick and easy to implement once you have a plan in place. If Santa was nice, he may have included a strobe and macro lens along with your camera and housing. This will get you on the way to great photos as soon as you hit the water. But if that’s not the case, don’t let the lack of these items hold you back, implement the other ideas above and you are well on your way to improving your photography on a single dive.


