Blast Fishing and Its Results

A word of warning, some of the images in this post are difficult to look at, if you don’t like to see images of destroyed reef please don’t look any further.

Beautiful Hard Corals

I find it sad that I need to preface a post like this, but unfortunately, its a fact of life these days in many areas around the world.  There are many reasons why different people in different countries participate in “dynamite fishing” but I won’t get into the economical, cultural or population based aspects of it, instead the goal of this post is to show the damage that blast fishing can have on a coral reef.  A lot of people are unaware of the reality of illegal fishing, and nothing can describe the damage better than a series of photos to go along with a short article.  On a recent dive trip, I was swimming along a beautiful reef, one of my favourite sites in this particular island group, when I began to notice evidence of bomb damage.  The first thing I happened to notice was 5 or 6 really large morays all within a few metres of one another; as this is a strange occurrence, I started looking around the area to see why this would be?  Large morays in this area don’t usually congregate unless there is an unusual food supply around.  Sure enough, looking at the hard coral, I noticed several cracks in the coral heads.  A few metres further on there was a large patch of rubble that was obviously bombed.  Not only was it bombed, it was done recently, either earlier that day or the day before.  The reason I could tell it was fresh was due to the fact the broken areas were bright white and the presence of several dead and shredded fusiliers under the coral heads!  Sadly, I had found the reason for the presence of the large morays: they were attracted by the smell of the dead fish on the bottom that were obviously victims of illegal dynamite fishing.  Thankfully, there was only one small area of the reef affected, in fact, many of my fellow divers were unaware that they were looking at dynamite fishing and were surprised to learn what caused the damage.

Barrel Sponge Destroyed

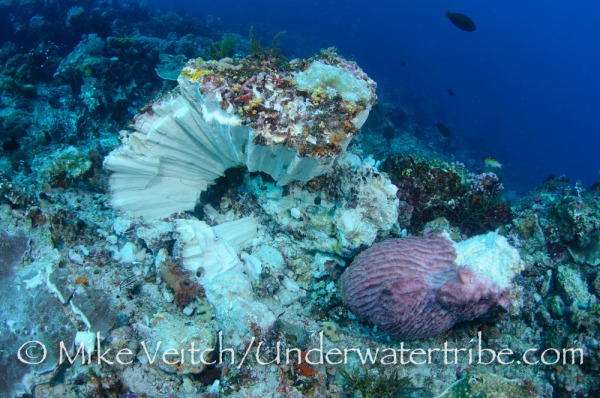
Two weeks later, I returned to this same remote island group with another set of guests; before diving this site, I briefed them about the previous damage we had encountered and told them to expect a small area of damage midway through the dive.  After jumping in and enjoying a great start with lots of soft coral and small tropical fish, we came around the corner to where I expected to see a small patch of damage; only to be confronted with wide scale destruction!  What had been a few square metres of damage two weeks earlier was now a patch of devastation about the size of a soccer/football field!  Obviously our friendly neighbourhood reef bombers had been back during our absence and continued where they had left off.  Not only was the reef in terrible condition, there was actually one unexploded bomb lying on the bottom!  One of my fellow divers pointed it out to me and of course I immediately wanted to take a photo of it, however, as I got closer I felt a sense of trepidation as I don’t know too much about these devices.  Obviously, I was a bit apprehensive that it could explode at anytime, maybe even my strobes would set it off? So I turned those off 🙂  I didn’t get too close, but I managed to take a photo of it and then made my way out of the area.  We didn’t go back to that reef again due to the instability of this item.

Basically, a “fish bomb” is a mix of kerosene and fertilizer that is stored in a discarded beer or soft drink bottle and then thrown into the sea where it sends out a large shockwave.  This shockwave kills all fish in the area including those in the water column such as fusiliers and surgeonfish, as well as those on the reef like butterflyfish and damsels.  Some of the fish float to the top where the fishermen simply scoop them up with a net, but the vast majority sink to the bottom due to damage to their swim bladders; these fish are not so easily collected and therefore go to waste.  The high level of dead and wasted fish and the severe damage to the coral means that a bombed area of reef is no longer a productive part of the ecosystem, a very inefficient method of fishing indeed!  Sadly, there was not a lot we could do as this remote location is far from any patrols and regular enforcement doesn’t take place.

Enough about trying to describe it, I think the best way to understand dynamite fishing is to show the damage in photos:

Hard Coral and Sponges Destroyed

Diver Inspects Bomb Damage

Undetonated Home Made Explosive

Reef Respect

Here is another of my articles from a few years ago in Scuba Diver Australasia magazine, this one is entitled “Reef Respect” and its about the importance of photographers and divers respecting the corals and marine life while underwater.  Some of the accompanying photos are tough to look at.. You can also find this at Wetpixel

Reef Respect

Bombing is just one Threat to Coral

When I first started diving for a living the number of divers with a camera in their hand were relatively few and far between.  Serious divers would carry a Nikonos V or video camera while those who were after a bit of fun would often have a Sea and Sea MX10 at their disposal.  However, with the recent explosion of digital photography, it seems everyone now has a camera of some description; from small compacts to multi strobed housed SLR monstrosities.  This is great in some respects, as the art of underwater photography has really blossomed and these images are being shown in more and more mainstream media helping to raise awareness of our fragile eco-system.  However, as popular as photography has become it’s having an inverse affect on what we love; the reefs of the world.  As we should practice what we preach, here are some guidelines the conscientious photographer should follow in order to protect the underwater environment.

 Placement

As photographers, we spend a lot of time with a subject looking for the perfect angle and trying to capture the essence of that animal.  Whereas the average diver often gives only a cursory glance and moves onto the next subject.  As we spend an inordinate amount of time in one place, we have to be more aware of our positioning and surroundings than everyone else.  Unfortunately, many careless photographers don’t care about their surroundings and zero in entirely on their subject.  Not only does this give photographers a bad name, but it destroys the reef and reef life around them.  Fortunately, there is a simple solution to this: look around before you settle in for a photograph.  Be sure that your fins will not be resting in an anemone or sponge, keep some air in your BCD in order to keep your torso off the ground, have your “danglies” clipped onto you, and use a finger to keep yourself steady.  It is far easier to keep your balance if you use your left hand as a steadying tool rather than on the camera.  By looking around before you settle in for a photo, it’s easy to find a bare patch or rock in which to support yourself.  Don’t just stick your hand out to grab the closest object if you find yourself losing buoyancy! Not only could you damage a delicate coral, you may stick yourself on a poisonous creature.  And of course nothing ruins a photo more than the off balance diver who tries to skull their hands to keep off the bottom, this results in stirring up backscatter particles in front of the lens.  When you are finished photographing your subject, take a breath and allow yourself to float away from the bottom before you start kicking your fins.  Trying to kick off the bottom will result in a major dust cloud and broken bits of coral flying everywhere.

Photographer and Magnificent Anemone

Current

In wide angle photography there is another dilemma that comes into play: current.

It’s not easy to keep yourself in place taking a photo if you have current pushing you along.  If you find a subject along a current swept wall there’s an easy way to stop yourself and get that photo.  Simply turn around and face into the current and steady yourself with a one or two finger grip on a bare patch on the wall.  By doing so, you won’t have to fin a lot and therefore not kick any fragile sea-fans or soft corals.  Once you are finished, push yourself away from the wall with that hand, don’t kick with your fins in an attempt to turn around!  This will only result in damaging the marine life around you.

Sea Fan and Photographer

Getting Sticky With It

Cameras aren’t the only recent development that have gained in popularity the last few years; “pokey sticks” a type of stainless steel rod, are now just as commonly seen as cameras.  When used appropriately, these are a great asset to photographers and non photographers alike, as they allow the user to hold themselves away from the bottom with one hand instead of grasping onto coral and other fragile organisms.  But, used in the wrong hands, these instruments can be a weapon of destruction.  Many talented dive guides are able to use these tools in a professional manner by ruffling the dirt in front of a mantis shrimp hole or tapping on a rock to get the attention of an octopus.  There is no problem with this, as long as it’s done in a gentle manner.  However, many regular divers and photographers have now taken it upon themselves to use their “sticks” to try to manipulate the critters on the reef.  Oftentimes, it’s not done in a gentle way and photographers are the guiltiest species of all as they try to pry a mimic octopus out of its hole for a once in a lifetime shot.  Photographers are also guilty of tempting dive guides to do this in exchange for a healthy tip.  Unfortunately, this scenario is playing out more and more often in popular diving spots and its effect can be seen by dwindling numbers of creatures on dive sites.  As responsible photographers we can have a great influence over the behaviour of others, by showing an example and not doing it ourselves and encouraging over zealous dive guides not to do it for our benefit as it’s not acceptable behaviour.

Patience!

Don’t rush in to take photos or prod a mantis shrimp with a stick, as your intended subject will only retreat back into its hole.  Instead of trying to force subjects into certain behaviour, it’s far better to display patience with marine life and allow them to act naturally.  By watching your subject from a comfortable distance, you can gauge their natural patterns and behaviour.  It will also give them a chance to get used to your presence and gradually allow you to get closer.  You can then move forward and hopefully get that winning shot.  In this vain, also remember that you can’t disturb or potentially harm animals in an attempt to add the perfect photo to your portfolio.  Deliberately bending seafans to get a better angle of a pygmy seahorse or pulling the arms off of a crinoid to shoot a shrimp are completely unacceptable behaviour for everyone.

Beautiful Hard Corals

Courtesy is Everything

It’s not only the marine life that should be treated with courtesy but your fellow divers and photographers as well.  As most dive resorts practice “group diving”, odds are you will be diving with other photographers and divers when you are underwater.  In order for everyone to have a successful dive, it’s common courtesy to take a few photos of a subject and then move along so others also get a chance.  If it’s a subject that you have a particular desire to spend a lot of time with, wait until everyone else has taken their photos and then come back to shoot it again.  Also, be careful when you leave a subject you have been shooting.  Be sure that you don’t disturb it when you leave in order to give your fellow divers a chance to shoot it as well.

Flashy Behaviour

Too many flashes can damage small fish life

Do you hate it when someone comes up to you and takes your photo with a bright flash?  This is the same feeling that fish and crustaceans feel when photographers barrage them with light. The sensitivity of the optical nerve of organisms that live underwater is far greater than humans due to living in a dim environment.  Therefore, the effect of bright strobes is felt much more so by the oceans’ inhabitants.   In order to lessen your impact upon marine life it’s wise to limit the amount of photos you take of any particular subject.  Not only will you be taking photos of that cute little pygmy seahorse, everyone else on the dive will too!  By being patient and waiting for your subject to get in position before firing off a shot, you will have far less impact on it than those who “machine gun” image after image in order to capture one perfect shot.  The sea life will thank you for it.

At the end of the day, we all love photography and can’t wait to get back in the water after our latest trip has ended.  Unfortunately some of us have returned to places we have been in the past only to find the inhabitants we interacted with are no longer there!  Although this may be caused by natural events such as storm damage or coral bleaching, there is no denying that popular dive locations suffer from a large amount of diver damage as well.  By practicing considerate and safe photography you can lessen your impact and footprint on the coral reef.  If everyone does their part, by following the guidelines above, we will all benefit in the long run with a healthy and happy underwater world.

Damaged Hard Coral

Environmental Impact Photos

Over the years, I have seen a lot of damage done to reefs all throughout the Pacific, from huge storms to coral bleaching to crown of thorns starfish, and my least favourite: blatant destructive fishing by mankind.  Whenever I encounter damaged reefs it makes me both sad as well as angry, especially when I know the damage is being done by dynamite fishing.  This sort of destruction is especially prevalent in the Indo-Pacific, but it’s certainly not localized to that region as many areas of the world suffer from this and other forms of non-sustainable fishing practices. Shark finning is the big environmental cause these days and there is a lot of publicity for it (and for good reason as its an appalling practice) but there are other dire impacts happening out there that don’t see the same amount of publicity they deserve.  The atrocities being done to mantas (as well as other rays) and dynamite fishing are two issues that really need a lot more publicity in order to raise their profile with the public.  One of the ways to do this is to publicize the damage that such practices can inflict upon the underwater world.   This is the reason I am introducing a new gallery on my Photography site called Environmental Issues.  In the past, I have always included these images within other “geographical” galleries but now I think I should showcase the horrible things that we humans do to our planet.   Not all of the photos are from direct human impact, I will also include reefs damaged by typhoons etc in this gallery.  Sadly, this gallery will continue to grow as coral reefs the world over continue to dwindle due to the pressure we are putting on them.  On a brighter note, I will also add positive impact photos to this gallery as well when I am able to document people working to sustain the marine ecosystem.

The Gallery can be found here:  Environmental Issues

Photo Gallery in Sanur, Bali

I am proud to announce that a selection of my images are now on display in the Liquidmocean Gallery in Sanur, Bali, Indonesia.  Founded by photographer Mark Thorpe of Liquidmocean the gallery houses a selection of water inspired images such as water droplets, surfing and wave photography, and of course my underwater images.  If you are in Bali please stop by the gallery which is located in the Six Point Building just off the Bypass beside McDonalds.  All of the canvas and fine art prints are available for sale and are the perfect addition to a home or business, custom sizing is available.  Hope to see you there!

Moluccas Photos in Dive The World Magazine

Back in April I spent 14 days on the Damai Two with writer Terry Ward on a trip through the Moluccas region of Indonesia from Ternate in Halmahera, across to Ceram and finishing in Ambon.  The article is now published in the beautiful quarterly”Dive the World” magazine which is published in Denmark but available worldwide.  If you get a chance to purchase this magazine its really worth the investment, they really focus on photography and interesting stories.  Their website is www.dtwmagazine.com and you can sign up to subscribe direct from their site.

Horseshoe Bay Panoramic

Each time I visit Horseshoe Bay (or Nusa Kode) I am struck by the beauty of the surroundings. From eagles and kites flying around, to monkeys, pigs, and dragons wandering along the beach, to the amazing cliffs of Rinca that ring the bay, it’s an area that has to be experienced to believe. I have always felt that trying to capture an image of the area is beyond the capability of a camera and it can only be savoured properly in the mind’s eye. However, I decided to take a series of photos of the area the other day and then stitch them together into a large format panoramic using Photomerge in Photoshop. Although it still pales in comparison to being there, for those of you who have never visited, here it is, enjoy!

The Mentor

Another one of my old “In Focus” articles is up on Wetpixel.com, The Mentor

Read it in full here on the blog as well.

Mentoring Your Photography
By Mike Veitch.

Bought all that fancy new gear but having trouble putting it together? Blinding yourself with the strobe instead of illuminating fish?

It’s time to seek professional guidance to further your photography habit.

Workshops often occur in places with fantastic photo ops.

You’ve spent hours on the net scouring websites and chat rooms for ideas and inspiration; you have assembled your new gear time and time again; you have even read the instruction manual from front to back! But does the idea of getting in the water and taking pictures seem like a daunting task? Not to worry, you are not alone! What options do you have to make the idea of plunging into the ocean with your new setup less stress inducing? Fortunately, there is an easy answer to that question. How about spending time with a mentor to guide you along the confusing world of shutter speeds and f-stops?

With a world of workshops and instructors out there, it’s hard to choose where to begin. The first step is addressing where you are in the learning curve and finding a situation that will give you the most benefit. If you are new to photography then winning prizes at a “photo shootout” may be a bit much to hope for. Similarly, shooters with several years of photography experience may find a “beginners” class too basic for their needs.

Here I break down 4 popular options to better understand the “pros and cons” of each in order to invest your time and money wisely.


PADI Underwater Photography Specialty

As the world of digital photography exploded in recent years, PADI didn’t sit on its heels to watch it go by. A brand new Digital Photography course is available, designed specifically with new photographers in mind. The course follows a simple yet effective mantra of “Shoot, Examine, and Adjust”, a perfect match for the instant feedback available from digital cameras. The thoughtfully designed workbook guides the photographer through basics such as composition, adjusting camera settings, and computer work. Coupled with an experienced photographer/instructor, this course is a great way for the new photographer to get comfortable with their camera. One major benefit of the class is the chance to have a lot of underwater time with an instructor on hand helping to set up shots and guiding you though proper adjustments. As an added bonus, the PADI Digital Photography course can be taken just about anywhere! Most PADI dive centers around the world will have a photo instructor on hand who will be only too happy to help you get started.

What to look for: Choose your instructor well! Ask to meet the instructor ahead of time and offer to show him/her your camera equipment and manuals. A good instructor will want to know all about your camera, offer him/her the opportunity to take the manual home a day or two in advance of the class in order to be well prepared to meet your needs.

On location photo workshops

Tim Rock instructs a class about the finer points of underwater photography.

Not too thrilled with the idea of jumping into your local pool or quarry in the middle of winter to learn photography? No problem! Throughout the year many of the world’s top underwater photographers offer “on location” workshops. Not only will you get the chance to learn from full-time photographers, you get to dive in the top destinations in the world! Workshops are a great way to take your photography to the next level as you have the chance to learn from folks who actually do it for a living. Basic and advanced workshops can be found and cater to the needs of novice and experienced photographers. Basic workshops start from the beginning and explain everything a new photographer needs to know to get them shooting top quality photographs in no time. With a weeklong course, there is plenty of time to absorb the information and put it to good use while churning out a stunning portfolio of images. Advanced workshops are geared to those who have the basics down but want to learn tricks of the trade and further their personal skills. Workshops typically consist of diving in the morning with group lectures in the afternoon and the evening reserved for critiquing sessions and entertaining multi media presentations. You will also enjoy diving and socializing with a group of like-minded individuals who want to discuss photography and learn at the same time. Watching the improvement of your fellow students throughout the week is almost as satisfying as seeing the benefits of “putting theory to use” on your own photos.

The social aspect of workshops and photo shootouts ensures a good time for all!

What to look for: Research and communication ahead of time is important. Professionals who put the students first conduct the best workshops. They spend their time underwater with you and not with their camera. This means they are giving 100% of their attention to the students and offering guidance underwater, not working on their own portfolio!

Photo shootouts with celebrity judges

Workshop judges hard at work discussing the winning photos.

One of the more popular events today is the Photo Shootout. These come in several forms: from one-day local events to one-week extravaganzas. Typical shootouts attract a large number of photographers all vying for extravagant prize packages. Although not really a learning event per se, many shootouts host a panel of judges who give informative and helpful discussions during the evening. These professionals are open to give advice on questions of all sorts, from how to get a certain shot at a particular site to the latest Photoshop techniques. Shootouts offer a fun and relaxed environment to meet new people, dive great destinations, and the chance to win camera gear and dive trips!

What to look for: Experienced photographers with all the latest and greatest gear sign up for these events specifically to win the big prizes. If your aim is to improve your photography significantly, the learning opportunities of these events is limited compared to a workshop. However, if you know your camera, you enjoy a good time and meeting new folks, and really want to win some prizes; then these events are for you.


Shootouts have a lot of sponsors and offer some very enticing prize packages.

One on one pro photography courses

One on one instruction maximizes the learning curve for the student.

With their “workplace” as the ocean, many of the world’s best underwater photographers live in amazing seaside locations. Oftentimes, these photographers are available for “one on one” photography courses. What better way to master the art of photography than to spend a few days with a personal mentor? The advantages of an individual class are many: tailored to meet your needs no matter your experience, no “slow” students to slow down the class, the opportunity to spend as much or as little time on particular subjects as you want…the list goes on and on. Even better, the pro is with you every step of the way watching your composition and offering critiques based on shots he/she watched you take. The learning curve of a “one to one” class is much faster as the instructor does not have to split his/her time among a group of students, it’s just you! This option may cost more money than others, but if your goal is improving your photography to its utmost, then this is the option for you.

What to look for: Location, location, location. Having an idea of what subjects you want to shoot and where they are located is key. Once you have decided on the area you would like to visit, do some research into who may live there. Odds are, if the area offers superb diving, an experienced professional lives near by. Even if he or she doesn’t market classes to the general public, don’t be shy! Pros are open to helping out those who want to learn and will go out of their way to help you along the way.

Living in the Indo Pacific area is special in many ways, one of which is the abundance of good diving. And with great diving come a lot of top-notch local photographers; so get out there and take advantage of one! Workshops, classes, and shootouts are on offer all over the region. Plan your calendar accordingly and sign up for one now, not only will you reach your goal of improving your photography, you may even win a new camera!

About the author: Originally from Vancouver, B.C., Canada, Wetpixel moderator Mike Veitch is a professional underwater photographer and trip leader. After spending many years working on boats and resorts in the Indo-Pacific region, Mike has settled in Indonesia where he spends his time photographing the worlds richest marine bio-system and conducting photography workshops and leading trips throughout the country. For more information please visit his website.

Mike is a frequent contributor and field editor to Scuba Diver Australasia magazine where he wrote the “how to” underwater photography column, “In Focus” from 2006-2009. This series is a collection of his “In Focus” articles that originally appeared in the magazine during that time, the format and photos have been updated for Wetpixel.

Top 10 Photos of 2011

Alright, seems I missed the annual Best Photo of 2011 thread over on Wetpixel, that showcases dozens if not hundreds of fantastic photos each year, as I was out of signal range diving around West Papua and Komodo (yes yes, a tough life I know)

Anyhoo, on the Wetpixel thread the rule is just “one” (which often gets broken) photo per person, well, as this is my blog I am going to show 10 instead! No rules for me to break here.. Let me say that these are not necessarily my ten best or most original or even most popular images from the year, but rather, my 10 favourite images of the year. It was a tough bunch to choose from as I did dive in a lot of places in 2011… how about a list? Raja Ampat, Ambon, Banda, Triton Bay, Cendrawasih Bay, Halmahera, Buyat Bay, Lembeh Strait, Kalimantan Province, Bali, Lombok, Bima, Sangeang, Komodo, Flores, Alor, and not to forget Layang Layang in Malaysia. I think I have probably dove more places in Indonesia in 2011 than a small handful of other folks (like the dive guides who work with me ☺ ).

So without further ado..in chronological order, 10 photos from 2011.

Corals and Trees, Raja Ampat, 6 January 2011

Many of you may think this comes from the Blue Water Mangroves in Raja Ampat, but it’s actually from a place called Aljui Bay also in Raja Ampat. There is a small island in the middle of the bay with wonderful soft corals and seafans that grow close to the surface of this undercut island and allow for interesting photo opps even in just a couple of feet of water. Each time I went there it seemed the conditions were overcast or the water somewhat murky, until one day when the conditions were perfect with a high tide, no wind, and bright morning sun.

Toadfish Portrait, Raja Ampat, 22 January 2011

Staying in Aljui Bay, this is a portrait of what is called a Toadfish, a strange little fish that only comes out at night and makes a loud “ribbit” sound like a large toad. I had heard the croak of these guys many times in Raja Ampat but had never seen or photographed one. Therefore, each time we visited Raja Ampat in 2010 and 2011 I would go night diving in Aljui Bay as it’s a great location to see these very interesting looking fish. For those of you who know me well you may say to yourself…”what? Mike, night dive? By choice? I don’t believe it!” Well, this photo is proof! Actually, it took me three night dives over three charters to finally get this little guy (around 30cm or 12 inches long) who was tucked under a small coral head in just 8 m (25 ft) of water.

Whaleshark, Cendrawasih Bay, 1 April 2011

Cendrawasih Bay in Indonesia is the hotspot of Whaleshark action at the moment and I had the chance to visit there early in the year. With up to 6 whalesharks at one time swimming around our group of divers, the encounter certainly didn’t disappoint. My favourite image is this one with a single shark surrounded by a school of fish and its mouth slightly open as it was in the process of yawning.

Four Whalesharks, Cendrawasih Bay, 1 April 2011

On the same day, I was able to capture 4 whalesharks in one frame, I thought this was pretty outstanding as there aren’t too many photos out there with multiple whalesharks in it, never mind 4!

Raindrops and a Ship, Moluccus, 23 April 2011

This is not your ordinary photo and it certainly wouldn’t score highly on a compositional level but it certainly has an interesting look to it. I was waiting for the skiff to pick me up after surfacing from a dive in an absolute tropical downpour of rain. This was actually taken with a 60mm macro lens and flat port while I was floating at the surface, the macro lens actually shows how large the rain drops really were. Good old rainy season, that is the 30m long Dive Damai in the background. ☺

Jellyfish, Kakaban Lake, Kalimantan, Borneo, 31 May 2011

When I lived in Palau back in 99-02 I would visit the jellyfish lake there quite often with my Nikonos V and take multiple photos each week. One of my more enduring photos from that time is of a backlit jellyfish that went on to win several photo competitions. My trip to Kakaban in May was my first time to visit a jellyfish lake with a digital camera and I was definitely looking forward to recreating that image to see how it would look. Well, I couldn’t have been happier with the results as the ease of composing with an SLR was much easier than the Nikonos as well as the colour contrast seemed to be superior, at least compared to the scanned slide. The two tone green and blue with the starburst sunrays really works for me and it may be my favourite image of the year.

Green Turtle, Turtle Traffic, Maratua Atoll, Kalimantan, Borneo 1 June 2011

It’s no secret that I wasn’t too impressed with the diving in and around the Derawan/Sangalaki area which includes Maratua and Kakaban. The highlights for me were exactly two sites, Jellyfish Lake (a snorkel) and “Turtle Traffic” on Maratua. Turtle Traffic was not a nice reef, as the coral was mostly beat up and not photogenic, however, we encountered over 40 green turtles on a single dive! That is a pretty impressive number as most dives I have been on in my life may feature just one or two turtles on a dive if luck is on my side. To have over 40 turtle encounters in an hour is an amazing number, especially when I was able to get 8 of them together in one frame! This truly was a special place and this large turtle was the most photographic of the lot as she just sat there batting her eyes a few times and I composed a couple of photographs of her.

Hypselodoris nudibranch, Bima Bay, Sumbawa, 6 October 2011

I do love my nudibranches, and Bima Bay, a little known but very productive muck diving area, is full of them. It also seems to have a high number of the visually striking Hypselodoris bullocki nudis and its close relatives which can be anywhere from a light pink to dark purple and are great photo subjects. This rather large individual was perfectly perched on top of a clump of mucky stuff and allowed me to take a low angle with a single strobe from the left. No, there is not a “snoot” involved in the lighting and neither is there any Photoshop to make the background black.

Diver in the action! Hard to Find Rock, Komodo, 21 October 2011

This is Brian, he is hooked in to the action on Hard to Find Rock in North Komodo filming amazing fish action going on around him. It was one of those perfect dives at Hard to Find, a submerged pinnacle, when everything came together perfectly, the current was mild, we were the only divers there, the viz was incredible, and the fish action was off the charts! Thousands upon thousands of fusiliers were pulsing close to the reef as they were herded by a number of giant and blue fin trevallies into a big fish ball in the current. As the trevallies would strike, the fusiliers would bolt toward the divers trying to avoid the large predators. It was one of those dives that no one wanted to end, so we dove it another 3 times!

Raja Ampat Reef Scene, 12 December 2011

For those who have visited Raja Ampat, one thing that sticks out is colourful reef and lots and lots of fish. Well, although this is true, it’s not always easy to capture it all in a photograph. As tropical reef fish such as damsels and anthias pulse up and down close to the reef, others such as grouper and angelfish dart amongst the coral. Trying to capture the bright red Coral Trout in a wide angle scenic is a tough assignment as it tends to be a rather shy fish that sticks to shelter and swims quickly from rock to rock. In this photo, I was lucky, as this Coral Trout just happened to swim into the frame as I took the shot!

Jellyfish and Sunrays 10 Years After

One of the most successful photos of mine from back in the film days is a rather iconic mastigias jellyfish photo from Jellyfish Lake in Palau taken in 2001. This shot was taken with Fuji 100 ISO film and a Nikonos V camera using a 15mm lens while snorkeling the lake in the early morning sun. I believe the settings on the shot were f11 and 1/250 a second or perhaps 1/500th per second (Note to digital photographers, we didn’t have EXIF data back then :P) It was one of a series of photos taken with different speeds and fstops in order to line them up side by side and choose the best exposed image. For years, it was one of my most popular images and has certainly been published many times. However, I always knew that I could have done better if I had used an SLR camera with the ability to actually frame the photo properly instead of using the parallax viewfinder of the Nikonos. The problem I always saw with that photo was that it was off centre in the frame, although I guess I could have cropped that in PS, that is not my style. In June 2011, I was finally able to get the chance to revisit the photo and try again. I visited the Jellyfish Lake in Kakaban Island, Kalimantan Province in Indonesia, near the more famous island of Sangalaki. The lake is great as it is much larger than its Palauan counterparts and also seemed somewhat clearer, great photo opportunities abounded! Although there was not the pure density seen at Jellyfish Lake, Palau, the lake was very picturesque and the surrounding mangroves offered great photo opportunities as well. After exploring the lake for a while, I decided it was time to try to recreate my photo from Palau and set about to find a good sized jelly to shoot. Once I found a jelly close to the surface I set my camera (Nikon D90 in Aquatica housing) to 1/500 and f11 (ISO 200) and fired off a few shots. It was apparent straight away that I had nailed the shot in the compositional sense of jellyfish placement in the photo. Through the lens composing sure is a lot easier than a viewfinder on top of the camera! I stuck around and shot several more photos at different focal lengths and all had the jellyfish placed nicely in the centre, the amount of keepers was almost 100% compared to just a few with the Nikonos. That alone has justified my switch to digital some 7 years ago or so 🙂 The one thing that I wasn’t sure about was what the sunrays would look like compared to the original. Well, as you can see for yourself they look pretty darn good, in fact I would say the photo looks much less muddy than the film version (but that is also partly due to the scanning process). The D90 and other newer DSLR cameras certainly can now rival the sun ray effects of film. Here is a side by side comparison so that you can see for yourself.