Nyepi and the Ogoh Ogoh Parade

BaliLandMV13-301Balinese culture has long fascinated me, from my first visit in 96 until the present, in which I call Bali home, the integration of daily life and the local Hindu religion is something that I am always reading and learning about, as well as watching it everyday!  Although I have lived in Indonesia since 2007, I have not had the opportunity to fully experience the Balinese “New Year” celebration before.  The name of this celebration is called Nyepi and means “day of silence” and like other new years celebrations in other parts of the world, it’s the biggest party of the year!  Its basically a three day ceremony and involves the day of the Ogoh Ogoh (more on that in a bit), a day of silence, and a day of forgiveness.  Basically, after 12 midnight of the first day the entire island goes black, electricity is not allowed and everyone needs to be silent for the next 30 hours until 6am of the following day!  Yes, the entire island shuts down, including the airport, no flights come in or out of Bali on that day, no one is allowed out of their homes or hotels, and all shops are closed.  Hotels do have electricity and obviously they do have some lights on but everyone, including tourists, are requested to respect the holiday by being discrete and quiet throughout the day.  Only “village security” and emergency vehicles are allowed on the streets during that period.

BaliLandMV13-304However, the coolest part of the Nyepi festivities has to be the Ogoh Ogoh parade.  What is an Ogoh Ogoh you may ask?  Well, it’s a paper mache monster that each village spends many months lovingly constructing, in often massive proportions!  The Ogoh Ogohs are meant to manifest and embody bad spirits that have taken up residence on the island over the year.  During the Ogoh Ogoh parade residents shake and prance with the Ogoh Ogohs in order to force the bad spirits up and away from the island.  After hours of prancing the Ogoh Ogohs along the streets, many of them congregate on the beach for a final “push” where many of these statues are destroyed or even burned.  Once the bad spirits have been chased away everyone turns out their lights and remain silent in order for the bad spirits not to see an opportunity to come back to the island.  By keeping the lights off and remaining quiet, the people hope to convince the spirits that there is nothing to see and therefore the bad spirits will go elsewhere to settle.

As this was my first time really seeing the Ogoh Ogoh parade, I was absolutely amazed at how many people were there.  I joined many of my friends at the McDonalds corner in Sanur, along with what must have been 100,000 of our closest friends!  Hundreds of Ogoh Ogohs were paraded past by excited and joyful locals who were obviously having a great time.  We were surrounded by lots of young children who were watching the parade with a great sense of fun and adventure.  The whole night was one big street party (the roads were closed to traffic by around 730pm or so)  and there was absolutely no hint of testosterone in the air like is usually found in western cities during big street parties, the police in the area were having a great time watching it along with everyone else, we could watch them taking a lot of photos with their cell phones.

BaliLandMV13-410BaliLandMV13-368


However, pictures can’t show the mood of revelry and sheer amount of fun everyone was having as well as a short video can.  Watch the smaller Ogoh Ogoh and what it is doing to the giant pig!  There may be a few swear words in there…


Back In Bali!

Bali0660MV08smallAfter four months in Canada, the longest I have spent there since 2004(!), I have now returned to Bali and finally have some internet going.  I will be posting here a lot more regularly from now on as life gets itself organized in a somewhat less hectic fashion over the coming months.  One thing I can say, Bali is a lot warmer than Vancouver and I definitely need to reacclimatize as I seem to sweat way more than before, AC is now my best friend!  I will head off to north Bali tomorrow to go diving with the Underwater Tribe and we will be posting about our adventures here as well as on the Underwater Tribe Facebook and Twitter pages, its a good time to subscribe to those if you haven’t already as we will soon be posting quite actively.  Tomorrow will be my first dive since October, my longest time out of the water in about 10 years!  Hopefully I recall how to do it 🙂  We will be checking out some new dive spots and some key land photography areas as well, stay tuned!


8 Ways to Improve Your Photos on a Single Dive!

Another in the series of previously published Scuba Diver Australasia In Focus articles

8 Ways to Improve Your Photography on a Single Dive

It’s a brand new year and I am sure there were lots of underwater goodies in the stockings of avid divers during Christmas.  For those who received a new camera, it may seem like the “latest and greatest” camera should be able to take stunning pictures straight out of the box.  However, sadly that is just not the way it works with underwater photography; don’t be dismayed however!  Here are 8 tips to consider on your first dive with that great new piece of technology.

Get closer
Raja Ampat, West Papua, Indonesia, Pacific Ocean

This is the single most important piece of advice for any new underwater photographer.  Although it’s tempting to use the ever present zoom control on your compact camera, it’s always best to use your fins to “fill the frame” as opposed to the zoom dial.  Getting physically close to the subject adds a host of positives to your photography.  Foremost, it means there will be less water between your camera and the subject; this means less backscatter and richer colours in your photos.  It also means you can utilize a higher numbered f-stop in order to maximize how much of your photo is in focus.  Remember, the higher the number, the better the depth of field.  However, don’t just ignore that zoom dial, it does have an important role in photography.  When you have gotten as physically close as you can to your subject, but the composition still doesn’t work right, utilize the zoom dial to isolate your subject and fill the frame before you shoot.

Use Add On Lenses

Porecelain Crab on Soft Coral

If Santa was kind, you may have also received some “add on” accessories with your housing.  This could be a macro lens, a wide angle lens or even better: an external strobe.  By utilizing all the tools at your disposal, your chances of a stunning photo increase exponentially.  One of the drawbacks of a compact camera is a relatively narrow field of view when it comes to pure wide angle photography.  In order to light up an entire sea fan, soft coral or charismatic megafauna, a wide angle lens is a must.  By allowing you to fill the frame with your subject from a closer distance, it allows all of the benefits discussed above.  To really make the colours of a soft coral “pop” you need to have your camera as close as possible to the subject.  A wide angle “add on” allows this but at the same time does not restrict you to only big subjects on a single dive.  The beauty of the compact housings is the ability to change these “add on” lenses underwater.

For the critter lovers there are also “macro” lenses available.  Although many compacts come equipped with a macro preset, it is very limited in its usefulness underwater.    Some brands of camera will not allow zoom while in the macro mode and others even restrict the use of flash.  In order to fill the frame with your subject you need to be mere centimetres away from it!  Obviously this does not work well when it comes to shy fish or invertebrates as they won’t often allow a diver to get that close.  By adding a supplemental macro lens you can enjoy the benefits of zooming in tight on small subjects without having to get so close that it runs away.  There is even the ability to stack macro lenses on top of one another for that extra tiny pygmy seahorse.

Use an External Strobe

Lembeh10MV-1097

Lembeh10MV-442

The greatest “add on” you can add to your system is the external strobe.  One of the drawbacks of the compact camera is the shadow that it casts over the subject from the lens mount.  The only cure to this bit of frustration is adding an external strobe and arm set to your system.  By getting the strobe up and away from the lens, you will eliminate shadowing right away.  Another major benefit of an external strobe is the ability to minimize image ruining backscatter.  An external strobe allows you to utilize “edge lighting” and not illuminate particulate directly in front of the camera.  A third major advantage of an external strobe is the power output available.  By having a wider and stronger flash, larger objects can be lit properly to bring out rich and pleasing colours.

Shoot Up
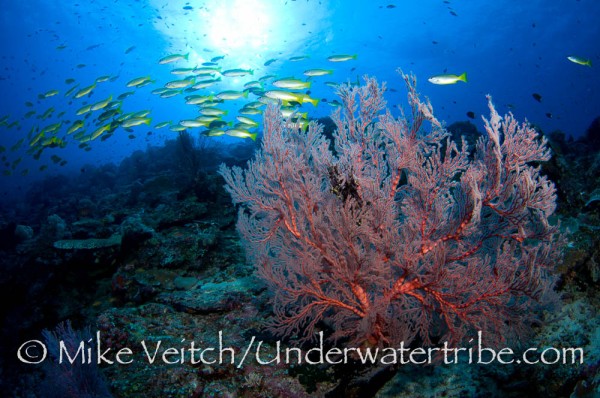
Seafan and Snappers

This may sound simple, but by getting low and shooting up, your photos gain a whole new dimension and contrast.  One of the most common mistakes a beginner makes is to hover above their subject and shoot directly down on it.  This results in the recognizable anemone and clownfish combination looking not like a bright and beautiful bit of nature but rather more like a bowl of spaghetti and orange meatballs. By getting down to the anemone’s level and shooting straight or a little upward, the fish will look like a fish and the anemone can look like a “technicolour dreamcoat”. In wide angle photography, the advantage of shooting up is instantly obvious.  By aiming toward the surface, you achieve rich, colourful foregrounds contrasted against deep blue backgrounds.

 Shoot Vertical
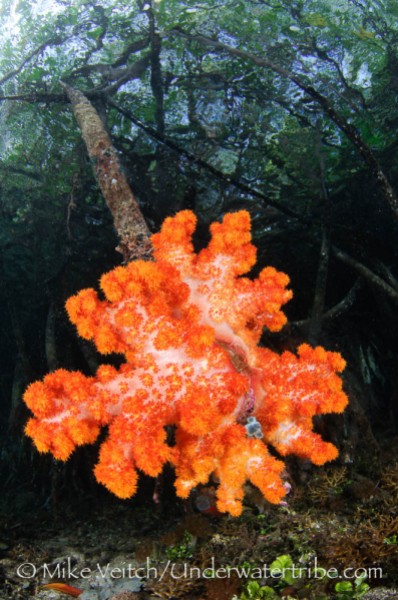
Soft Coral in Blue Water Mangroves

Shooting vertically is another simple trick with major rewards.  Although it may seem a little unnatural at first, a quick turn of the camera will bring out the natural lines of subjects that a horizontal viewpoint can’t display.  Think facial portraits, nudibranches, or eels; all of these subjects are well represented by a vertical composition.  Another thing to remember is the rule of thirds; align the eyes or main part of the subject along the top or bottom third of the frame in order to create depth and balance in the photo.

Stop, Watch, Shoot

Lembeh10MV-2514

The most memorable photographs are ones that capture the behaviour of the subject.  The underwater world hosts a plethora of animals that perform a variety of interesting activities night and day.  Eating, fighting, mating, and cleaning actions are a small sample of different actions that marine life exhibit.  However, it’s not an easy task to capture these behaviours on camera.  Simply seeing a shrimp cleaning the mouth of a grouper  does not mean you can get a photo.  If you rush in as quick as possible to capture the moment, you will be shooting yourself in the foot.  In order to shoot behaviour sequences properly it takes patience and a bit of stealth.  The smart way to approach these events is to “stop, watch, and shoot”.  By stopping to watch the action from a respectable distance, you give the animals time to become aware and comfortable with your presence.  You can then slowly close the distance until the subjects are within the focal distance and fire away.

Critical Review and the Histogram

 By far the greatest advance of photography in the digital age is the instant feedback found on your monitor.  Unfortunately, not enough folks use this tool to their advantage during a dive.  The monitor can be used to check the focus, the lighting, and for any distractions throughout the frame such as a wayward diver in the background.  In order to utilize this properly you must look at the entire frame, not just the main subject.  It’s often the negative space (everything but the main subject) that makes or breaks the photo.  Take the time to step back from the subject and look intently at your photo, don’t just take a series of shots and move on to the next subject.  By critically reviewing the photo while still in front of the subject, you can make fine adjustments and take the photo again.  The “histogram” is the best way to double check exposure, especially in very bright conditions.  By understanding how to read the histogram you can adjust settings appropriately in order to achieve the best exposure.  There is plenty of information about reading histograms freely available on the internet.

Know Your Camera!

One downfall of many new photographers is their eagerness to jump straight into the water without learning all the capabilites of their camera.  In order to capitalize on capturing wildlife, you need to know how to change settings such as shutter speed, f-stops, EV compensation, and the macro button as quickly as possible.  As the situation changes underwater, you don’t have time to fiddle too long trying to figure out where a particular button is.  By practicing on land and reading the instruction manual, you will gain a great advantage underwater as it becomes second nature to change settings on the fly.

Although it may sound like a lot, these 8 steps are quick and easy to implement once you have a plan in place.  If Santa was nice, he may have included a strobe and macro lens along with your camera and housing.  This will get you on the way to great photos as soon as you hit the water.  But if that’s not the case, don’t let the lack of these items hold you back, implement the other ideas above and you are well on your way to improving your photography on a single dive.

Favourite Images of 2012

As I did last year (link here) I have chosen 10 photos that showcase some of my favourite images from 2012.  This year though I have a disclaimer to go along with it.. I didn’t take a lot of photographs!  I spent a lot of time on the Dive Damai and the Damai Dua throughout the year, but I spent a lot of that time training staff, ongoing maintenance projects, dealing with the inevitable local bureaucracy (which there was a lot of in 2012 as Damai continues to blaze new trails in Indonesia, which means dealing with new local governments and local residents who aren’t used to a boat load of tourists showing up on their door!  Trust me, there is a lot of work/haggling in the background that the guests don’t see, always a fun part of the job 🙂 )  And, I did a lot of photo instruction and dive guiding as well, so although I spent a lot of time underwater, I didn’t shoot too much for myself.  However, I certainly got to dive a lot of new places, see new things, and document the good and the bad.  I will sort of break these images into sets in order to speak about them in context because some are not necessarily beautiful photos, but they sure do get the mind working…

The first image is from my first foray into Komodo in the “off season” of January, a much under rated time of year to experience this magical place, especially the south end of the islands.  With blue seas and warm water at Horseshoe Bay it truly is different than visiting in “high season”.  However, one lasting image I took away from this trip was something I saw outside of the park to the east where Rinca Island meets Flores, not much more information is needed, just look at the picture.. freshly dynamited coral head!

KomodoMV12-218

Sticking with Komodo, here are a couple of images that remind us of why we go there!  Komodo really is my favourite destination in Indonesia due to the variety of encounters to be had.  If you get the chance to go from November through to February its an opportunity not to be missed as the exploration possibilities in the south are great.

Close Encounters with a GoPro and a Dragon in Rinca

KomodoMV12-1088

Photo Stitch of 5 Images of the Iconic Horseshoe Bay, South Rinca

KomodoMV12-1140

The next image is from a small village on a small island north of the island of Ceram. I have visited this area 3 times now, and I am pretty sure that is the only 3 times that any foreigners have visited this particular village.  Here are some of the local woman sharing a laugh with Kat, one of the ladies on the trip, great communication does not rely on a common language as can be seen here!

Tourist Laughing with Locals

Another island village that we were the first foreigners to visit was on the far eastern tip of Lifamatola to the north west of Ceram and south west of Halmahera.  As we traveled south from Halmahera on the way there, we were followed by this amazing yet ominous storm cloud formation.

Storm Clouds on the Horizon

I spent a lot of my time in 2012 shooting wide angle photography, in fact, as I peruse my photos I seem to have shot macro a total of 3 times in 2012, on the 11th, 12th, and 13th of January in Horseshoe Bay!  As part of my wide angle series, I shot a lot of scenics and was always in search of interesting hard coral scenes.  For some reason I just love a healthy hard coral garden, when others get bored of all the hard coral, I am just amazed with the foundations and designs and can spend all day taking natural light photos of healthy reef.  Here is my favourite of 2012

Coral Reflecting on the Surface, South Loloda Islands, Halmahera Province, Indonesia

Hard Coral and Reflection

One dive also stands out for an amazing cave filled with golden sweepers, no words necessary.

Spice Islands, Maluku Region, Halmahera, Indonesia, Pacific Ocean

Of course with the good comes the bad… I also was witness to a lot of hard coral damage throughout the year, in fact, it really made me angry!  I had the chance to explore a lot of Halmahera and the North Maluku areas where I documented a lot of reef destruction.  A lot of reef in this region has been badly damaged, here is the worst, a tiny seamount in the middle of nowhere that had the potential to be a stunning dive site but local dynamite fishermen have completely destroyed it!  It really was the most complete amount of devastation I have ever seen to hard coral.

Bombed Coral

Luckily, it was only a week or two later that we found this gem of a dive site with amazingly in tact hard coral not a couple of miles away from a major population centre!  It really was incredible to find a huge coral garden of this delicate cabbage/lettuce coral in such great shape amongst a lot of damage in nearby reefs.  This was the last dive I did in the Halmahera area and allowed me to depart on a happy note!  But, it also made me sad to know that so many of the reefs in the area used to look like this!  Don’t get me wrong, it’s not all doom and gloom in Halmahera, there are some very good dives in the area.  In fact, the Bacan government and the Jailolo government in the west (among others) are now actively promoting dive tourism and are really working with the local communities to help protect and educate folks about coral conservation and how it will positively affect them if they help preserve their ocean.  I can see this area really taking off in the future as there is some great diving, it just needs support, nurturing, and some more exploration.  Divers Lodge Lembeh have also opened a resort in the eastern side of Halmahera in Weda Bay that is supposed to have some stunning reefs, but we never did make it that far north into Weda.

Hard Coral Garden

My last image is dedicated to my friend Andy Shorten, he just loves my whaleshark photos!  I was lucky enough to do 3 trips to Cendrawasih Bay in 2012 and had perfect photo opportunities.  I like this image the best as it gives the idea of a mother whale shark teaching her baby to feed.. (although its a large male pushing a smaller one out of the way!)

Two Whalesharks

That’s it for 2012, I hope you enjoyed the photos and that some of them taught you a little something as they did for me.  Onward to 2013 where I hope to spend more time underwater with a camera, see you in the water!

Blast Fishing and Its Results

A word of warning, some of the images in this post are difficult to look at, if you don’t like to see images of destroyed reef please don’t look any further.

Beautiful Hard Corals

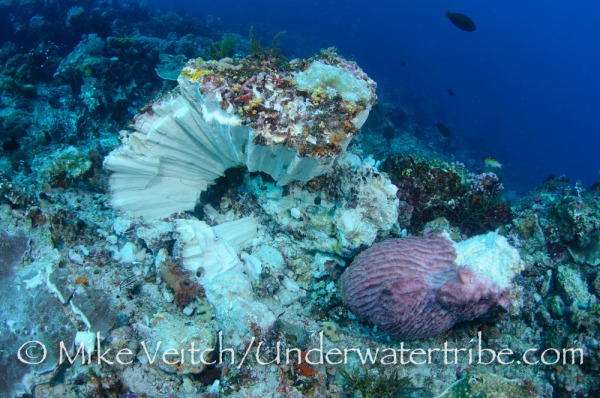
I find it sad that I need to preface a post like this, but unfortunately, its a fact of life these days in many areas around the world.  There are many reasons why different people in different countries participate in “dynamite fishing” but I won’t get into the economical, cultural or population based aspects of it, instead the goal of this post is to show the damage that blast fishing can have on a coral reef.  A lot of people are unaware of the reality of illegal fishing, and nothing can describe the damage better than a series of photos to go along with a short article.  On a recent dive trip, I was swimming along a beautiful reef, one of my favourite sites in this particular island group, when I began to notice evidence of bomb damage.  The first thing I happened to notice was 5 or 6 really large morays all within a few metres of one another; as this is a strange occurrence, I started looking around the area to see why this would be?  Large morays in this area don’t usually congregate unless there is an unusual food supply around.  Sure enough, looking at the hard coral, I noticed several cracks in the coral heads.  A few metres further on there was a large patch of rubble that was obviously bombed.  Not only was it bombed, it was done recently, either earlier that day or the day before.  The reason I could tell it was fresh was due to the fact the broken areas were bright white and the presence of several dead and shredded fusiliers under the coral heads!  Sadly, I had found the reason for the presence of the large morays: they were attracted by the smell of the dead fish on the bottom that were obviously victims of illegal dynamite fishing.  Thankfully, there was only one small area of the reef affected, in fact, many of my fellow divers were unaware that they were looking at dynamite fishing and were surprised to learn what caused the damage.

Barrel Sponge Destroyed

Two weeks later, I returned to this same remote island group with another set of guests; before diving this site, I briefed them about the previous damage we had encountered and told them to expect a small area of damage midway through the dive.  After jumping in and enjoying a great start with lots of soft coral and small tropical fish, we came around the corner to where I expected to see a small patch of damage; only to be confronted with wide scale destruction!  What had been a few square metres of damage two weeks earlier was now a patch of devastation about the size of a soccer/football field!  Obviously our friendly neighbourhood reef bombers had been back during our absence and continued where they had left off.  Not only was the reef in terrible condition, there was actually one unexploded bomb lying on the bottom!  One of my fellow divers pointed it out to me and of course I immediately wanted to take a photo of it, however, as I got closer I felt a sense of trepidation as I don’t know too much about these devices.  Obviously, I was a bit apprehensive that it could explode at anytime, maybe even my strobes would set it off? So I turned those off 🙂  I didn’t get too close, but I managed to take a photo of it and then made my way out of the area.  We didn’t go back to that reef again due to the instability of this item.

Basically, a “fish bomb” is a mix of kerosene and fertilizer that is stored in a discarded beer or soft drink bottle and then thrown into the sea where it sends out a large shockwave.  This shockwave kills all fish in the area including those in the water column such as fusiliers and surgeonfish, as well as those on the reef like butterflyfish and damsels.  Some of the fish float to the top where the fishermen simply scoop them up with a net, but the vast majority sink to the bottom due to damage to their swim bladders; these fish are not so easily collected and therefore go to waste.  The high level of dead and wasted fish and the severe damage to the coral means that a bombed area of reef is no longer a productive part of the ecosystem, a very inefficient method of fishing indeed!  Sadly, there was not a lot we could do as this remote location is far from any patrols and regular enforcement doesn’t take place.

Enough about trying to describe it, I think the best way to understand dynamite fishing is to show the damage in photos:

Hard Coral and Sponges Destroyed

Diver Inspects Bomb Damage

Undetonated Home Made Explosive

Reef Respect

Here is another of my articles from a few years ago in Scuba Diver Australasia magazine, this one is entitled “Reef Respect” and its about the importance of photographers and divers respecting the corals and marine life while underwater.  Some of the accompanying photos are tough to look at.. You can also find this at Wetpixel

Reef Respect

Bombing is just one Threat to Coral

When I first started diving for a living the number of divers with a camera in their hand were relatively few and far between.  Serious divers would carry a Nikonos V or video camera while those who were after a bit of fun would often have a Sea and Sea MX10 at their disposal.  However, with the recent explosion of digital photography, it seems everyone now has a camera of some description; from small compacts to multi strobed housed SLR monstrosities.  This is great in some respects, as the art of underwater photography has really blossomed and these images are being shown in more and more mainstream media helping to raise awareness of our fragile eco-system.  However, as popular as photography has become it’s having an inverse affect on what we love; the reefs of the world.  As we should practice what we preach, here are some guidelines the conscientious photographer should follow in order to protect the underwater environment.

 Placement

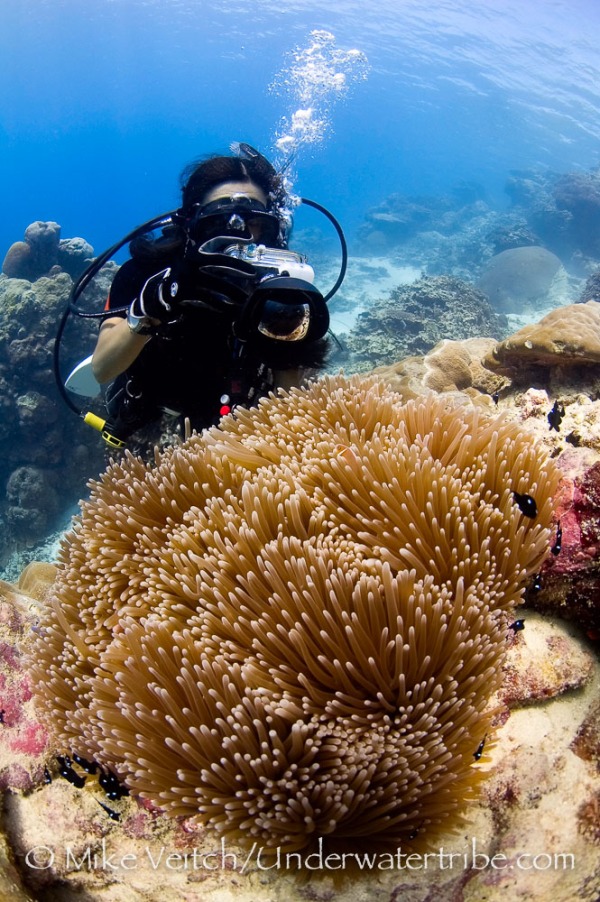
As photographers, we spend a lot of time with a subject looking for the perfect angle and trying to capture the essence of that animal.  Whereas the average diver often gives only a cursory glance and moves onto the next subject.  As we spend an inordinate amount of time in one place, we have to be more aware of our positioning and surroundings than everyone else.  Unfortunately, many careless photographers don’t care about their surroundings and zero in entirely on their subject.  Not only does this give photographers a bad name, but it destroys the reef and reef life around them.  Fortunately, there is a simple solution to this: look around before you settle in for a photograph.  Be sure that your fins will not be resting in an anemone or sponge, keep some air in your BCD in order to keep your torso off the ground, have your “danglies” clipped onto you, and use a finger to keep yourself steady.  It is far easier to keep your balance if you use your left hand as a steadying tool rather than on the camera.  By looking around before you settle in for a photo, it’s easy to find a bare patch or rock in which to support yourself.  Don’t just stick your hand out to grab the closest object if you find yourself losing buoyancy! Not only could you damage a delicate coral, you may stick yourself on a poisonous creature.  And of course nothing ruins a photo more than the off balance diver who tries to skull their hands to keep off the bottom, this results in stirring up backscatter particles in front of the lens.  When you are finished photographing your subject, take a breath and allow yourself to float away from the bottom before you start kicking your fins.  Trying to kick off the bottom will result in a major dust cloud and broken bits of coral flying everywhere.

Photographer and Magnificent Anemone

Current

In wide angle photography there is another dilemma that comes into play: current.

It’s not easy to keep yourself in place taking a photo if you have current pushing you along.  If you find a subject along a current swept wall there’s an easy way to stop yourself and get that photo.  Simply turn around and face into the current and steady yourself with a one or two finger grip on a bare patch on the wall.  By doing so, you won’t have to fin a lot and therefore not kick any fragile sea-fans or soft corals.  Once you are finished, push yourself away from the wall with that hand, don’t kick with your fins in an attempt to turn around!  This will only result in damaging the marine life around you.

Sea Fan and Photographer

Getting Sticky With It

Cameras aren’t the only recent development that have gained in popularity the last few years; “pokey sticks” a type of stainless steel rod, are now just as commonly seen as cameras.  When used appropriately, these are a great asset to photographers and non photographers alike, as they allow the user to hold themselves away from the bottom with one hand instead of grasping onto coral and other fragile organisms.  But, used in the wrong hands, these instruments can be a weapon of destruction.  Many talented dive guides are able to use these tools in a professional manner by ruffling the dirt in front of a mantis shrimp hole or tapping on a rock to get the attention of an octopus.  There is no problem with this, as long as it’s done in a gentle manner.  However, many regular divers and photographers have now taken it upon themselves to use their “sticks” to try to manipulate the critters on the reef.  Oftentimes, it’s not done in a gentle way and photographers are the guiltiest species of all as they try to pry a mimic octopus out of its hole for a once in a lifetime shot.  Photographers are also guilty of tempting dive guides to do this in exchange for a healthy tip.  Unfortunately, this scenario is playing out more and more often in popular diving spots and its effect can be seen by dwindling numbers of creatures on dive sites.  As responsible photographers we can have a great influence over the behaviour of others, by showing an example and not doing it ourselves and encouraging over zealous dive guides not to do it for our benefit as it’s not acceptable behaviour.

Patience!

Don’t rush in to take photos or prod a mantis shrimp with a stick, as your intended subject will only retreat back into its hole.  Instead of trying to force subjects into certain behaviour, it’s far better to display patience with marine life and allow them to act naturally.  By watching your subject from a comfortable distance, you can gauge their natural patterns and behaviour.  It will also give them a chance to get used to your presence and gradually allow you to get closer.  You can then move forward and hopefully get that winning shot.  In this vain, also remember that you can’t disturb or potentially harm animals in an attempt to add the perfect photo to your portfolio.  Deliberately bending seafans to get a better angle of a pygmy seahorse or pulling the arms off of a crinoid to shoot a shrimp are completely unacceptable behaviour for everyone.

Beautiful Hard Corals

Courtesy is Everything

It’s not only the marine life that should be treated with courtesy but your fellow divers and photographers as well.  As most dive resorts practice “group diving”, odds are you will be diving with other photographers and divers when you are underwater.  In order for everyone to have a successful dive, it’s common courtesy to take a few photos of a subject and then move along so others also get a chance.  If it’s a subject that you have a particular desire to spend a lot of time with, wait until everyone else has taken their photos and then come back to shoot it again.  Also, be careful when you leave a subject you have been shooting.  Be sure that you don’t disturb it when you leave in order to give your fellow divers a chance to shoot it as well.

Flashy Behaviour

Too many flashes can damage small fish life

Do you hate it when someone comes up to you and takes your photo with a bright flash?  This is the same feeling that fish and crustaceans feel when photographers barrage them with light. The sensitivity of the optical nerve of organisms that live underwater is far greater than humans due to living in a dim environment.  Therefore, the effect of bright strobes is felt much more so by the oceans’ inhabitants.   In order to lessen your impact upon marine life it’s wise to limit the amount of photos you take of any particular subject.  Not only will you be taking photos of that cute little pygmy seahorse, everyone else on the dive will too!  By being patient and waiting for your subject to get in position before firing off a shot, you will have far less impact on it than those who “machine gun” image after image in order to capture one perfect shot.  The sea life will thank you for it.

At the end of the day, we all love photography and can’t wait to get back in the water after our latest trip has ended.  Unfortunately some of us have returned to places we have been in the past only to find the inhabitants we interacted with are no longer there!  Although this may be caused by natural events such as storm damage or coral bleaching, there is no denying that popular dive locations suffer from a large amount of diver damage as well.  By practicing considerate and safe photography you can lessen your impact and footprint on the coral reef.  If everyone does their part, by following the guidelines above, we will all benefit in the long run with a healthy and happy underwater world.

Damaged Hard Coral

Environmental Impact Photos

Over the years, I have seen a lot of damage done to reefs all throughout the Pacific, from huge storms to coral bleaching to crown of thorns starfish, and my least favourite: blatant destructive fishing by mankind.  Whenever I encounter damaged reefs it makes me both sad as well as angry, especially when I know the damage is being done by dynamite fishing.  This sort of destruction is especially prevalent in the Indo-Pacific, but it’s certainly not localized to that region as many areas of the world suffer from this and other forms of non-sustainable fishing practices. Shark finning is the big environmental cause these days and there is a lot of publicity for it (and for good reason as its an appalling practice) but there are other dire impacts happening out there that don’t see the same amount of publicity they deserve.  The atrocities being done to mantas (as well as other rays) and dynamite fishing are two issues that really need a lot more publicity in order to raise their profile with the public.  One of the ways to do this is to publicize the damage that such practices can inflict upon the underwater world.   This is the reason I am introducing a new gallery on my Photography site called Environmental Issues.  In the past, I have always included these images within other “geographical” galleries but now I think I should showcase the horrible things that we humans do to our planet.   Not all of the photos are from direct human impact, I will also include reefs damaged by typhoons etc in this gallery.  Sadly, this gallery will continue to grow as coral reefs the world over continue to dwindle due to the pressure we are putting on them.  On a brighter note, I will also add positive impact photos to this gallery as well when I am able to document people working to sustain the marine ecosystem.

The Gallery can be found here:  Environmental Issues

Photo Gallery in Sanur, Bali

I am proud to announce that a selection of my images are now on display in the Liquidmocean Gallery in Sanur, Bali, Indonesia.  Founded by photographer Mark Thorpe of Liquidmocean the gallery houses a selection of water inspired images such as water droplets, surfing and wave photography, and of course my underwater images.  If you are in Bali please stop by the gallery which is located in the Six Point Building just off the Bypass beside McDonalds.  All of the canvas and fine art prints are available for sale and are the perfect addition to a home or business, custom sizing is available.  Hope to see you there!

Moluccas Photos in Dive The World Magazine

Back in April I spent 14 days on the Damai Two with writer Terry Ward on a trip through the Moluccas region of Indonesia from Ternate in Halmahera, across to Ceram and finishing in Ambon.  The article is now published in the beautiful quarterly”Dive the World” magazine which is published in Denmark but available worldwide.  If you get a chance to purchase this magazine its really worth the investment, they really focus on photography and interesting stories.  Their website is www.dtwmagazine.com and you can sign up to subscribe direct from their site.